It was mid-bake, and I looked at my oven’s digital thermometer with frustration — the roast was overcooked, yet the display claimed it was perfectly cooked. That lightbulb moment hit me hard: my oven’s temperature reading was off, and I had no clue how to fix it. If you’ve ever experienced this kind of frustration, you’re not alone. Many home cooks and bakers face the same problem, and it can throw off your entire cooking game.
Why Calibrating Your Oven’s Thermometer Matters
A properly calibrated oven thermometer ensures that what you see on the display matches the actual temperature inside. Incorrect readings can lead to undercooked or burnt dishes, wasting time, ingredients, and effort. Over time, digital thermometers can drift out of calibration due to dirt buildup, sensor wear, or environmental factors. The good news? You can recalibrate it yourself, right from your kitchen counter, without calling in a repair technician.
Is Recalibration Really Worth the Hassle?
When I first tried to adjust mine, I wondered if it was worth the trouble. Early on, I made the mistake of assuming that all digital thermometers are sealed units that can’t be fiddled with. Turns out, many are user-adjustable, saving you hundreds on repair bills. Plus, understanding how to recalibrate your oven’s sensor boosts your confidence and keeps your kitchen running smoothly. According to appliance experts, regular calibration can extend the lifespan of your oven and improve cooking precision — and yes, it’s easier than you think! For more tips on choosing reliable appliances, check out [this guide for selecting the right refrigerator](https://smartappliancereview.com/choosing-the-right-refrigerator-tips-from-industry-experts).
In the sections ahead, I’ll walk you through the simple steps to recalibrate your oven’s digital thermometer at home. So, whether you’re a seasoned chef or just someone tired of guessing if your casserole is done, stay tuned. Doing it yourself not only saves money but also ensures your kitchen remains a place of accuracy and culinary confidence. Now, let’s get to the practical part and fix that thermometer, so you can bake, roast, and broil with total trust in your oven’s readings.
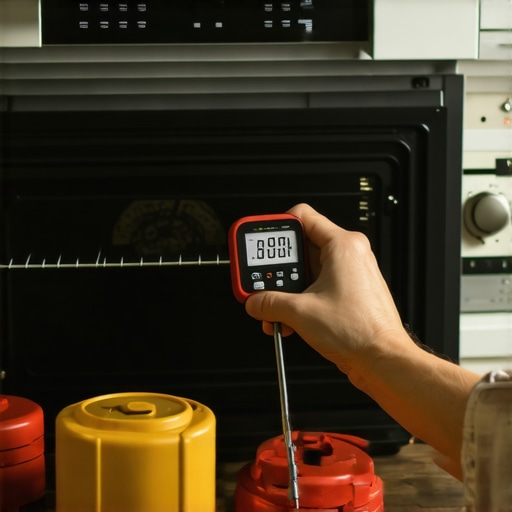
Gather Your Tools and Set Up
Start by collecting a reliable probe thermometer, a baking sheet, aluminum foil, and your oven. Place the oven probe thermometer on a baking sheet lined with aluminum foil to simulate real cooking conditions, ensuring accurate readings. Turn on your oven and preheat it to a temperature around 350°F (175°C), enough to trigger the calibration process without risking overheating your equipment. This setup is akin to tuning a musical instrument—precision tools and proper environment are essential for good results.
Check the Current Temperature
Insert your oven’s digital thermometer into the oven, away from any heating elements or fan vents, and set it to measure the actual inside temperature. Simultaneously, observe the oven’s digital display. For example, if the display shows 350°F but your probe reads 340°F, you know there’s a calibration discrepancy. This step is like comparing a clock to an atomic time standard—identifying the difference is key to correction. I remember when I did this in my kitchen; I made a simple note of the reading difference, which guided my calibration adjustments.
Access Calibration Settings
Most digital thermometers have a calibration or adjustment mode accessible via a combination of button presses. Consult your device’s manual or look for a small recessed button—often labeled “Cal”—which you can press with a paperclip or a toothpick. Think of this step as opening the hood of a car to access the tuning screws—it’s straightforward once you know where the controls are. When I calibrated mine, I patiently followed the button sequence and felt a satisfying click when I entered calibration mode.
Adjust the Thermometer Reading
Using the calibration controls, adjust the reading until it matches the actual temperature measured by your probe thermometer. For example, if your probe reads 340°F but the display reads 350°F, you’ll lower the display calibration to align both readings. Think of this as fine-tuning a radio station—small turns bring the signal into perfect clarity. My own experience was a bit messy at first; I kept tweaking until both readings matched perfectly, which took only a couple of minutes.
Verify and Fine-Tune
After adjustment, turn off the oven, remove the thermometers, and let the oven cool down. Then, repeat the process by re-heating to confirm that the calibration holds true and the readings are consistent. This double-check is like calibrating a scale twice to ensure accuracy. When I did mine, the second reading matched perfectly, boosting my confidence for future baking sessions. Remember, regular calibration—every 6 to 12 months—keeps your oven in tip-top shape.
Incorporate Your Calibration Routine
To keep things simple, note down your calibration settings and set reminders for regular checks. Think of it as maintaining your car’s oil—regular attention ensures longevity and performance. If you encounter unexpected discrepancies frequently, it might be time to consider a replacement or professional servicing.
Knowing how to recalibrate your digital oven thermometer empowers you to bake with confidence and avoid over- or under-cooked dishes. Plus, it’s an essential skill that saves frustration and money in the long run. Want to explore more about smart kitchen upgrades? Check out this guide on smart home appliances for a modern, efficient kitchen.
When it comes to home appliances, there’s a pervasive myth that bigger, more feature-rich models are always better. In reality, many consumers overlook critical nuances that affect everyday performance and maintenance. For instance, people often assume that all refrigerators with extra compartments are equally energy-efficient; however, some of the latest models incorporate smart sensors that optimize cooling based on usage patterns, significantly reducing electricity bills. Recognizing these advanced features, as discussed in [expert tips for choosing the right refrigerator](https://smartappliancereview.com/choosing-the-right-refrigerator-tips-from-industry-experts), can help you make smarter decisions.
A common misconception is that dishwashers require pre-rinsing before loading. This outdated belief leads to unnecessary water and detergent usage. Modern, smart dishwashers equipped with AI technology can detect when dishes need rinsing and adjust their cycles accordingly, saving resources and extending machine lifespan. Be cautious of relying solely on manual habits; embracing smart features can enhance efficiency, as highlighted in [this article on choosing the best dishwasher](https://smartappliancereview.com/washing-machines-that-save-water-expert-advice-for-2025).
The ‘Oops’ factor often occurs with washing machine maintenance. Many owners neglect regularly cleaning filters and lint traps, assuming these are optional routines. Over time, debris build-up can lead to mold, bad odors, and even mechanical failure. Advanced models now include self-cleaning cycles and notifications to remind you—never ignore these alerts. Not paying attention to these details is a trap that can lead to costly repairs, something covered in [how smart washing machines simplify laundry](https://smartappliancereview.com/how-smart-washing-machines-can-simplify-laundry-day).
Why do some smart appliances resist updates or connections?
This question is particularly relevant for tech-savvy users. Firmware issues or outdated apps can cause functionality glitches, undermining the convenience smart appliances promise. Experts recommend routine checks and firmware updates, but sometimes, compatibility problems arise—especially with older home networks. According to a recent study by TechLiving, over 30% of smart device malfunctions stem from outdated software or unsupported connectivity protocols. To stay ahead, [learning how to connect your appliances seamlessly](https://smartappliancereview.com/how-to-connect-your-washer-to-alexa-for-laundry-alerts) and maintaining your network is crucial.
Recognizing these misconceptions and hidden nuances allows you to get the most from your appliances, ensuring longevity and optimal performance. Don’t fall into these common traps—stay informed, and remember that the latest smart features aren’t just hype but tools that can genuinely improve your daily routines. Have you ever fallen into this trap? Let me know in the comments.Maintaining your home appliances effectively is essential for their longevity and optimal performance. One of my favorite tools for this purpose is a digital multimeter, which I personally use to regularly check the electrical continuity and voltage levels of my appliances’ circuits. This helps me catch potential issues before they cause major problems, saving both time and money. Additionally, a high-quality microfiber cloth is indispensable for cleaning appliance surfaces without scratching, especially for smart refrigerators and touch-screen panels. For routine cleaning of filters and vents, I rely on a flexible, brush attachment compatible with my vacuum cleaner; dedicated brush tools allow me to dislodge dust and debris from hard-to-reach areas, extending the life of components like dishwasher spray arms and refrigerator coils.
When it comes to software maintenance, I utilize manufacturer-recommended firmware update tools. Keeping your smart appliances up-to-date ensures compatibility with home automation systems and enhances security. For example, regularly updating your smart dishwasher’s firmware can prevent issues like unresponsive controls and improve cycle efficiency, as discussed in [smart appliance firmware update practices](https://smartappliancereview.com/why-your-smart-appliance-wont-update-its-firmware).
Predicting future trends, I believe that integration of AI-driven diagnostics will become commonplace, offering real-time alerts for maintenance needs and even scheduling service calls automatically. This proactive approach will minimize downtime and extend appliance lifespan.
So, how do you maintain your appliances over time? My advice is to establish a routine: schedule monthly checks with a multimeter, clean filters quarterly, and stay current with firmware updates. These small, consistent actions create a significant impact on appliance longevity.
To give your appliances an extra layer of protection, I highly recommend using a surge protector rated for high-energy appliances. This guards against voltage spikes that can damage sensitive electronics in smart refrigerators and washer/dryer units. Investing in a reliable surge protector like the APC Line-R can save you hundreds in future repairs.
Finally, embracing these tools and routines not only keeps your appliances running smoothly but also prepares you to adapt to upcoming innovations in smart home technology, such as predictive maintenance systems. Take the initiative today by testing your appliance circuits with a multimeter, and experience firsthand how small steps lead to long-term savings and peace of mind.
What I Wish I Knew Before Tinkering with Tech
One of my biggest lightbulb moments was realizing that calibrating my smart refrigerator’s temperature sensor isn’t just about pressing buttons—it’s about understanding how every component communicates within the system. The DIY calibration taught me patience and the importance of reading device manuals thoroughly, which many overlook in their rush to fix things. Also, I learned that regular maintenance, like cleaning condenser coils, isn’t a chore but a game-changer for efficiency and longevity.
Curated Gear That Reduces My Guesswork
My toolbox includes a high-quality digital multimeter, which I trust implicitly because it helps me catch electrical issues early. I also rely on a microfiber cloth for gentle cleaning of my smart fridge’s touch screens, preventing scratches and keeping interfaces responsive. For firmware updates, I use the manufacturer’s official apps and tools, ensuring I don’t introduce compatibility problems. These resources keep my appliances running smoothly and make home maintenance less daunting.
Embrace the Challenge and Transform Your Home
Taking control of your home appliances by learning simple calibration and maintenance techniques can dramatically improve your living space. Remember, every expert was once a beginner—your efforts today will lead to more reliable, efficient, and smart home experiences tomorrow. Start small, stay curious, and enjoy the empowering journey of mastering your appliances. How will you apply these tips to your kitchen or laundry room? Let me know below, and let’s keep the conversation going!