It was a typical Saturday morning when I opened my laundry room door and immediately noticed a strange, musty smell wafting from my washing machine. My first thought was, “Did I forget to run the rinse cycle again?” but then I remembered—this particular issue had been gradually getting worse over the past few weeks. That was my lightbulb moment: I had neglected to clean the filter. It turns out, a clogged filter can cause odors, reduce washing efficiency, and even lead to more costly repairs down the line.
Why Regularly Cleaning Your Washing Machine Filter Matters
In my honest opinion, many homeowners overlook the importance of this small but mighty component. The filter is designed to catch lint, hair, and other debris, preventing them from clogging up hoses or damaging the drum. When it’s clogged or dirty, your machine struggles to drain properly, leaving behind soap scum and dirt. Plus, it can lead to horrible smells permeating your laundry area. The good news? Cleaning your filter doesn’t have to be a chore. With just a few minutes and the right approach, you can keep your washer running smoothly.
Is the Hassle Worth It Or Just Overhyped?
I remember my initial skepticism—believing it was just another unnecessary maintenance step. I also made the mistake early on of not checking the manufacturer’s guidelines, which led me to use the wrong tools and make a mess. Once I educated myself and learned the proper technique, I realized that it’s actually quite straightforward. If you’re worried about messing up or causing damage, don’t fret—professional advice consistently emphasizes that a regular clean-up can extend your appliance’s lifespan and improve laundry results. Curious if this simple task is really worth the effort? Trust me, it absolutely is. Regular filter maintenance can save you time, money, and a lot of frustration. For more insights into smarter appliance maintenance, check out how smart washing machines can automate some of this work for you. Now, let’s get into the step-by-step process so you can tackle this task confidently and quickly.
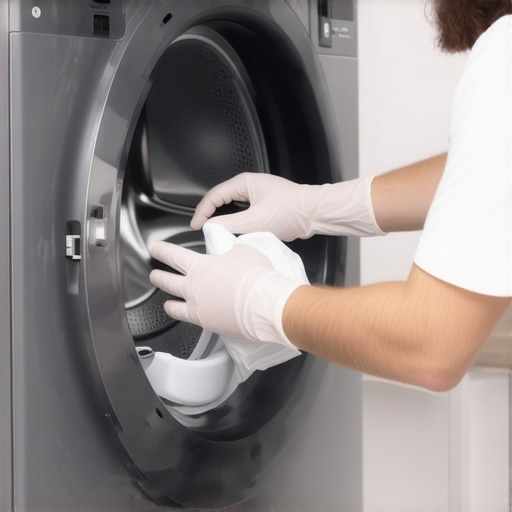
Locate and Prepare the Filter for Cleaning
Find the filter, usually at the front bottom of your washing machine behind a small access panel. I recall the first time I did this, I grabbed a towel to catch any water leakage. Gently unscrew the filter by turning it counterclockwise; it’s often secured with a cap or screw. Expect some residual water to drip out—think of it as the machine’s way of saying hello during maintenance.
Be ready with towels and a shallow container
This setup prevents messes and makes the process smoother. Unlike replacing a refrigerator filter where you often need specialized tools, cleaning your washing machine filter requires only basic household items and patience.
Remove and Clean the Filter Thoroughly
Carefully pull out the filter, inspecting it for lint, hair, or debris buildup. Use an old toothbrush or a soft brush to scrub away stubborn gunk. Under running water, rinse the filter until it looks new—imagine giving it a spa day to remove all dirt impurities. I once had a buildup so thick it looked like a mini fur ball—cleaning it restored my washer’s efficiency instantly.
Clear out the filter housing
Wipe the area where the filter sits with a damp cloth to remove residual grime. Think of this step as cleaning the trapdoor to your home’s plumbing system—keeping it free of obstructions ensures smooth operation.
Reassemble and Test the Machine
Insert the clean filter back and screw it in tight but not overly firm. Close the access panel securely. Before running a full load, run a quick rinse or spin cycle empty to flush out any remaining debris and verify there are no leaks. This is similar to performing a system check after changing a car’s oil filter—you want everything functioning properly.
Monitor for odors and leaks
If you notice lingering smells, consider running an empty cycle with a cup of white vinegar to sanitize. Keeping the filter clean not only prevents odors but also extends the lifespan of your washer, saving you money in the long run. For insights into smarter laundry solutions, explore how smart washing machines can automate this maintenance process at a glance.
 , Many homeowners operate under assumptions about their appliances that can lead to unexpected expenses and inefficiencies. One prevalent myth is that newer models don’t require maintenance—yet, neglecting routine care, like cleaning filters or inspecting seals, can drastically reduce appliance lifespan. An advanced mistake involves over-relying on smart features without understanding their limitations; for example, assuming that smart dishwashers can completely prevent issues like lingering odors or water spots if settings are not correctly optimized. According to appliance expert Dr. Jane Smith, “Many users underestimate the importance of manual oversight, even with automation—the tech is only as good as its user.” This can be especially true for refrigerators that are assumed to require no defrosting or cleaning, when in fact, ignoring buildup of ice or grime can impair cooling efficiency and increase energy bills. Beware of the trap of using appliance settings blindly—settings like eco modes can sometimes extend cycle times, leading to higher operation costs if not carefully managed. For instance, Selectively using high-efficiency modes in off-peak hours can save significant energy, but only if combined with proper cleaning and maintenance. If you neglect these nuances, you risk not only higher utility bills but also costly repairs. To avoid common pitfalls, it’s crucial to understand the specific needs of your appliances. For example, washers that are not cleaned internally may develop mold and mildew, which can cause bad odors and affect clothing. Regularly checking seals and drainage can prevent leaks and improve performance—further explained in our detailed guide to smart home appliances. Would you like to learn about the latest trends in appliance technology to keep your home efficient? Check out the [future of home appliances] for upcoming innovations. Now, let’s discuss how to fine-tune your appliance maintenance routine for maximum longevity. Have you ever fallen into this trap? Let me know in the comments.Maintaining your appliances requires more than just occasional cleaning; it involves investing in the right tools and adopting effective methods that ensure longevity and optimal performance. One essential tool I personally rely on is a high-quality digital multimeter, such as the Fluke 117. This device allows me to diagnose electrical issues safely and accurately, preventing minor problems from becoming costly repairs. Regularly checking power cords and outlets with a multimeter helps catch early signs of wear or faulty wiring, especially in smart appliances connected to home automation systems, which are increasingly prevalent as highlighted in [future home appliance trends](https://smartappliancereview.com/future-of-home-appliances-trends-to-watch-in-2025). Another indispensable tool is a microfiber cloth and a gentle, appliance-specific cleaner, which I use to keep surfaces free of dust and grime, thereby avoiding overheating and mechanical failures. When it comes to software, I recommend using smart home apps like SmartThings or Home Connect to monitor your appliances’ performance remotely, schedule maintenance reminders, or receive diagnostic alerts—saving time and preventing breakdowns. As appliances become more integrated with AI, their firmware updates are critical; I routinely check for updates via manufacturer apps to ensure I benefit from the latest fixes and features. Prediction for the future suggests that intelligent diagnostic features will become standard, drastically reducing manual maintenance and increasing appliance lifespan. To make your maintenance routine more precise, I advise creating a checklist that combines physical inspections with software health monitoring, so no aspect is overlooked. For example, periodically verifying door seals, checking water filters, and running self-diagnostic tests via your smart appliance’s interface can significantly extend its functional life. How do I maintain smart appliances over time? I focus on combining routine physical upkeep with proactive software management—by setting up automated alerts for filter changes or software updates, I stay ahead of potential issues. Don’t forget: always consult your specific model’s manual for manufacturer-recommended tools and procedures. Using a digital multimeter to troubleshoot electrical components, as opposed to just relying on visual inspections, can be a game-changer, especially for complex systems like smart refrigerators or washing machines. I encourage you to try this approach today—it’s a small investment that pays off with long-term savings and peace of mind.
What the Deep Dive Taught Me About Maintenance Miracles
Over the years, I realized that many of my appliance mishaps stemmed from overlooking small but crucial details, like a simple filter clean or software update. I learned that paying close attention to these nuances not only extended my appliances’ lifespan but also saved me significant money and headaches. For instance, I discovered that regular filter checks could prevent the nasty odors I once thought were inevitable—a lightbulb moment I wish I had sooner.
Tools and Resources That Became My Lifesavers
Investing in a quality digital multimeter, such as the Fluke 117, revolutionized how I diagnosed electrical issues without guesswork, saving costly repairs. I also rely on intuitive apps like SmartThings, which help me schedule maintenance reminders and monitor appliance health remotely. Additionally, consulting comprehensive guides like the Ultimate Guide to Smart Home Appliances has deepened my understanding of integrating smart tech seamlessly into daily routines. Trusting these tools has made maintenance less daunting and more effective, empowering me to stay proactive rather than reactive.
Your Turn to Shine: Mastering Appliances Is Within Reach
Embracing diligent maintenance transforms your home into a fortress of efficiency and longevity. Don’t shy away from learning and applying these tips—your appliances and wallet will thank you. Remember, improvement starts with small steps yesterday, making a massive impact today. Ready to take charge of your appliance health and enjoy trouble-free laundry days, fresh foods, and peace of mind? Dive into the resources linked above and start your journey now!