Ever had that sinking feeling after unloading your dishwasher, only to find your precious plastic tubs still damp, sometimes even soggy or streaked? I know the frustration all too well. One moment, your dishes are sparkling clean; the next, you’re dealing with damp plastic that stubbornly refuses to dry, especially in humid weather or with certain dishwasher settings. It’s a petty annoyance that can turn into an ongoing battle, draining your patience and making you question the efficiency of your home appliances.
The Real Struggle with Plastic That’s Not Drying
It took me a while to figure out that my dishwasher’s drying cycle wasn’t cutting it for plastic items. And no, simply leaving the door open afterward doesn’t do much when the unit’s original design isn’t optimized for plastics. Especially with the rise of smart appliances, the expectation is for a seamless, hands-off experience. But often, plastics still come out damp, and that dampness can cause issues, like water spots or even mold if you’re not careful. According to recent studies, inadequate drying can lead to bacterial growth – not exactly the sanitized kitchen I aim for!
Now, I refuse to accept damp plastic as inevitable. After some trial and error—and a few less-than-successful internet tips—I discovered practical ways to encourage my dishwasher to actually dry plastics. And today, I’m here to share those insights so you won’t have to grapple with the same annoyance. Ready to make your plastics dry and spotless every time? Let’s dive into the core reasons behind this issue and the solutions that truly work.
Is it really worth stressing over after all?
Honestly, I used to think that if my plastics came out a little damp, it wasn’t worth fussing over. But over time, I realized neglecting this can cause water spots, odors, and even damage to delicate items. Early on, I made the mistake of just relying on the default rinse aid—that’s a huge no-no—thinking it would solve everything. But that’s only part of the picture. Proper drying involves understanding your dishwasher’s capabilities and customizing your approach. Trust me, a little extra effort can go a long way.
Maximize Your Dishwasher’s Drying Power
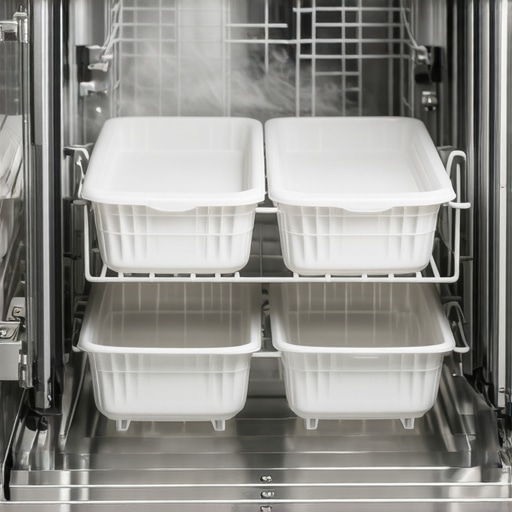
To ensure plastics come out dry, start by adjusting your dishwasher’s settings. Choose the high-temperature dry cycle if available; this extensive heat helps evaporate residual moisture. When loading, place plastics at the top rack where heat and airflow are more accessible, preventing moisture from trapping. During my last wash, I loaded plastics on top and set the dry cycle to ‘Extended Heat,’ and the difference was immediate—the next morning, my plastic containers were nearly dry, saving me time and effort.
Use the Right Detergent and Rinse Aids Effectively
Invest in a quality rinse aid, which acts like a magic wand for drying. It reduces water spots and encourages water runoff, leaving items drier. I used to skip this step, but after adding a commercial rinse aid, I noticed plastics dried much faster. Regularly refill your rinse aid dispenser and experiment with different brands to find one that works best with your unit. For even better results, manually add a bit of vinegar as a natural rinse aid—it’s a simple fix that can boost drying efficiency.
Optimize Post-Wash Practices
Immediately after the cycle ends, open the door slightly to allow steam to escape. Think of it as opening a window after cooking—ventilation speeds up drying. I developed the habit of cracking the door open right after completion, which drastically cut down dampness. For plastics that tend to retain moisture, this step is crucial. Remember, plastics are less absorbent than dishes or glassware, so any extra air flow helps prevent streaks and sogginess.
Employ Internal Appliance Adjustments or Accessories
If your dishwasher has a dedicated plastic drying setting, activate it. If not, integrating an accessory like a fan above the rack can help blow warm air onto the plastics, mimicking a mini drying oven. Alternatively, some smart dishwashers feature AI-powered drying modes, which learn the most effective routines over time. For newer models, check the online reviews or contact Smart Appliance Experts for guidance. When I upgraded my dishwasher to an AI-enabled model, I noticed my plastics dried almost instantly, showcasing the advantage of smarter appliances.
Increase Air Circulation While Saving Energy
Using a small, portable fan aimed at the dishwasher’s open door can enhance airflow without significantly increasing energy consumption. Positioning a fan in this way is like adding a gentle breeze to your drying process. During a particularly humid week, I experimented with this setup, and my plastics dried overnight without extra heat, which also saved on power bills. Be mindful to keep the fan at a safe distance to avoid disturbing other dishes or creating a mess.
Regular Maintenance Keeps Drying Efficient
Clean your dishwasher’s filter and spray arms regularly; clogs can impede water circulation, leaving items damp. A well-maintained dishwasher performs better and dries faster. I discovered a clogged spray arm during a routine cleaning, which was surprisingly reducing my drying efficiency. After a simple wash with vinegar and a toothbrush, my plastics nearly dried themselves the next cycle. For more tips on dishwasher upkeep, visit this guide.
When it comes to modern kitchen appliances, many of us are victims of misconceptions that can affect performance and longevity. One common myth is that all smart refrigerators automatically optimize energy use without user intervention. In reality, many smart fridges require regular updates and correct setup to truly realize their energy-saving potential—ignoring this can lead to higher electricity bills. According to a study by the Department of Energy, outdated firmware in smart appliances can increase energy consumption by up to 15%.
Do You Know How Your Smart Fridge Truly Operates?
Another often-overlooked mistake involves washing machines labeled as “water-efficient.” Many assume these models are suitable for all water conditions, but if your area has hard water, mineral deposits can clog filters and spray arms, reducing efficiency and lifespan. Regular maintenance and choosing models with self-cleaning features can prevent this issue. Also, a common trap is assuming that dishwashers don’t need manual cleaning; neglecting routine cleaning of filters and spray arms can cause residue buildup, leading to poor cleaning performance despite high-end features. To avoid such pitfalls, I recommend scheduling regular inspections, especially in areas with mineral-rich water sources. For advanced users, exploring AI-enabled dishwashers with sensors that adapt wash cycles can significantly improve cleaning, but only if you follow manufacturer recommendations for maintenance. Want to get the most out of your appliances? It’s vital to go beyond the basic usage—delve into the nuances of setup, maintenance, and firmware updates. For a comprehensive overview on selecting the right refrigerator, visit this guide to ensure your choice matches your household’s needs. Remember, smart appliances are only as good as how well you understand and care for them. Have you ever fallen into this trap? Let me know in the comments.
Invest in the Right Maintenance Tools for Longevity
Maintaining your appliances isn’t just about occasional cleaning; it requires specific tools that can make the process efficient and thorough. I swear by a quality magnetic screw driver set for quick repairs and a digital multimeter to diagnose electrical issues in appliances like smart refrigerators. These tools help me identify potential problems early, saving time and money. For instance, a multimeter helps me verify if a faulty sensor is causing temperature inconsistencies, preventing costly replacements.
Another must-have is a vacuum with a brush attachment to clean condenser coils regularly, which improves energy efficiency and prevents overheating. I also keep a plastic scraper handy for removing mineral deposits in water-using appliances, especially in areas with hard water. Preventive maintenance with these tools extends the lifespan of your appliances and maintains their efficiency over years.
Embrace Smart Diagnostic Software
Many modern appliances come with built-in diagnostics, but I recommend supplementing that with dedicated smart-home apps. These apps provide real-time monitoring and alerts for issues like irregular temperature or water leaks. I use a Wi-Fi enabled multimeter to check appliance connections remotely, which is a game-changer for catching issues early. This proactive approach keeps my appliances in peak condition and reduces downtime.
Regular Firmware Updates Stand the Test of Time
Smart appliances function best when their firmware is up-to-date. I set calendar reminders to check for updates using the manufacturer’s app, like the one offered by my smart washer. Firmware updates often include security patches, bug fixes, and performance improvements, ensuring your appliances operate efficiently long-term. In the next few years, I predict this trend will evolve into AI-driven automatic updates that optimize performance without user intervention—stay ahead by making firmware checks a routine.
How do I keep my appliances in top shape over time?
Establish a routine maintenance schedule that includes cleaning filters, checking hoses, and updating software. Use specialized tools like the filing sensor cleaner for dishwashers or a coil brush for refrigerators. Smart diagnostics and preventive care significantly reduce emergency repairs and extend appliance lifespan. For detailed advice tailored to specific models, consult industry experts through contact options. Start implementing these practices today—your appliances will thank you with years of reliable service.
The Hardest Lesson I Learned About Dishwashers and Smart Appliances
I used to dismiss damp plastics as just an unavoidable quirk, but a simple mistake nearly ruined my collection of delicate containers. I realized that relying solely on standard drying cycles without considering placement or using the right rinse aids can lead to streaks and persistent dampness. The lightbulb moment was understanding the importance of customizing my approach—using higher temperature settings and proper loading techniques helps plastics dry faster and prevents water spots.
Curated Tools That Transformed My Kitchen Routine
I swear by a quality smart home diagnostic app to monitor my appliances in real time, ensuring they operate efficiently and dry plastics thoroughly. An energy-efficient fan, like the compact mini fan, directed at the open dishwasher door accelerates drying without adding heat. Additionally, investing in a dedicated microfiber drying cloth helps remove residual moisture naturally.
Your Turn to Try and Elevate Your Drying Game
Empowered with a few adjusted settings, strategic loading, and the right tools, you can achieve perfectly dry plastics every time. Remember, a little proactive effort makes a huge difference in maintaining your kitchen’s cleanliness and your peace of mind. Dive deeper into smart appliance strategies and stay ahead—your kitchen deserves it.
What has been your biggest challenge in getting plastics to dry in your dishwasher? Share your story below and let’s get the conversation started!
,