Ever had that sinking feeling when you realize your brand-new refrigerator has leaked water all over the kitchen floor right after replacing its filter? I remember the frustration all too well. I was eager to keep my fridge running smoothly, but a simple filter change turned into a mini disaster—water everywhere, cleanup duty, and a sinking suspicion I’d broken something. That lightbulb moment made me realize: replacing your refrigerator filter isn’t just about swapping out a part; it’s about knowing the right technique to avoid leaks and messes.
Why Proper Filter Replacement Matters More Than You Think
In my early days of homeownership, I didn’t think much about changing fridge filters—until I faced a soggy kitchen floor. Turns out, a tiny mistake in the process can cause significant leaks, wasting water, damaging your floors, and leading to costly repairs. Ensuring you replace the filter correctly isn’t just about maintenance; it’s about protecting your home and saving money.
Is It Really Worth the Hype or Just another Hurdle?
I used to think replacing the filter was straightforward—just twist and turn. But I learned from my mistakes that rushing or not understanding the mechanism can lead to leaks. Early on, I didn’t realize that inserting the filter incorrectly was a common mistake that causes water to escape. Knowing the precise steps makes all the difference. Did you know that improper filter installation can cause leaks and even damage your appliance’s internal components? According to home appliance experts, following the manufacturer’s instructions can save you from headaches and repairs later on. Curious about the latest advancements? Check out this [overview of innovative refrigerators in 2025](https://smartappliancereview.com/innovative-dishwashers-with-ai-technology-you-must-know) to see how new features can also help prevent common issues.
Now, let’s dive into the practical steps to replacing your refrigerator filter without risking leaks or messes. With a little know-how, you’ll be able to perform this task confidently and keep your appliance—and kitchen—dry.
Prepare for the Replacement
Before touching your fridge, unplug it to prevent electrical hazards. Remove any stored items near the filter area to avoid spills. Think of this step as opening the hood of a car—safety first to prevent accidents. I once skipped unplugging and got a slight shock when water sprayed unexpectedly—I learned my lesson the hard way, ensuring safety is the foundation.
Locate and Remove the Old Filter
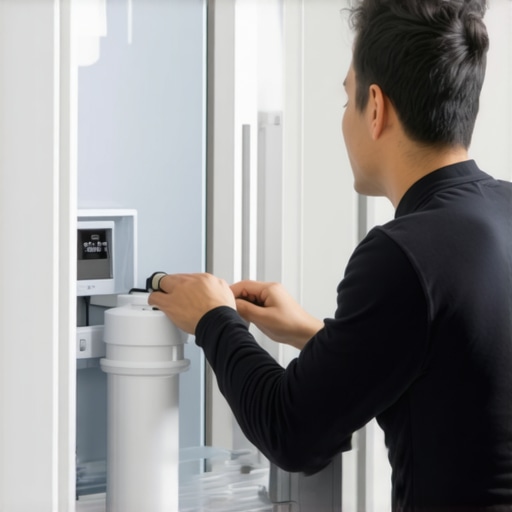
Find the filter—usually inside the fridge’s upper right corner or behind a panel. To remove it, turn the filter counter-clockwise until it disengages, akin to unscrewing a large bolt. Use a rag to catch any residual water. I once struggled with a stubborn filter, so I gently applied a bit of lubricant on the seal to ease removal, avoiding damage and preventing leaks. For detailed info on choosing the right refrigerator, check out this guide.
Prepare the New Filter
Remove the new filter from its packaging, rinse it if specified, and prime it by dispensing a few cups of water—similar to priming a new pen. This removes air and ensures proper flow. I learned that skipping priming led to air bubbles and inconsistent water flow, making the process messier. Always double-check the filter type to match your model, preventing fitting issues and leaks. For advanced fridge features, see this article.
Install the New Filter Correctly
Align the arrows or locking tabs and turn clockwise until it clicks securely, like locking a lid on a potion bottle. Don’t overtighten, as this can deform the seal and cause leaks. I once over-tightened and ended up with a tiny crack, leading to water leaks—lesson learned: gentle but firm is best. Ensure the seal is flush; a distorted seal invites water escape. Remember, proper installation is key to leak prevention.
Test for Leaks and Reset the System
Plug the fridge back in, then dispense water to confirm there’s no leakage—think of it as the ‘test drive’ before fully closing the hood. If water drips or pools, re-tighten the filter slightly. If everything is dry, proceed to reset the filter indicator—most units require holding a button for several seconds. I once forgot this step, and the device kept signaling a need for replacement, causing confusion. Check your manufacturer’s instructions for exact reset procedures. For troubleshooting smart fridge alerts, visit this resource.
Wrap-Up and Maintenance Tips
Regularly inspect seals and replace filters as recommended, like changing the oil in a car—vital for longevity. Keep a small towel nearby for any accidental drips during future replacements. Remember, a properly installed filter prevents leaks, conserves water, and keeps your fridge running efficiently. For more maintenance hacks, explore this comprehensive guide.
Many homeowners assume they fully understand their appliances, yet the reality is that widespread misconceptions can lead to efficiency loss, damage, or even safety hazards. For instance, a prevalent myth about dishwashers is that regularly rinsing dishes before loading extends their lifespan. In contrast, expert advice suggests that over-rinsing wastes water and time—modern models are designed to handle some food residue without issues. Overwhelmed by conflicting tips online, some users skip crucial maintenance steps, such as cleaning dishwasher spray arms, leading to reduced cleaning performance and costly repairs.
Is Your Dishwasher Really Dirty If It Looks Clean?
Some believe that dishes look sparkling because the machine is effective, but in reality, mineral deposits, soap scum, or mold can hide in unseen areas like spray arms or filters. Neglecting these can cause unpleasant odors and bacterial growth, impacting hygiene. Studies by the Environmental Protection Agency show that regular deep cleaning of dishwasher components keeps appliances running efficiently and ensures health safety. This subtle maintenance nuance is often overlooked but plays a critical role in appliance longevity. When it comes to refrigerators, a common misconception is that setting the temperature as low as possible preserves food longer. However, overly cold temperatures can cause freezer burn or freeze vital nutrients in produce, undermining freshness. Research from food safety experts highlights that optimal refrigerator temperatures—around 37-40°F (3-4°C)—balance preservation and efficiency. Many users also fail to realize that smart appliances, while increasingly advertised for convenience, require understanding advanced features to truly benefit from automation and energy savings. Ignoring firmware updates or misconfiguring settings can negate their advantages, effectively turning a smart fridge into a dumb one. As noted in a recent report on the future of smart home devices, staying updated and properly configuring your appliances enhances performance and security. A trap many fall into is neglecting the cleaning of washing machine seals and filters, assuming they will be self-maintaining. This neglect not only causes mold-odor issues but also reduces washing efficiency and may result in costly repairs. Experts recommend a monthly inspection and cleaning routine, a simple step that can make a drastic difference. Plus, choosing the right cycle and load pattern can reduce water and energy consumption, aligning with eco-friendly goals. These advanced nuances form the backbone of effective home appliance management. Are you guilty of ignoring these hidden details? Have you ever fallen into this trap? Let me know in the comments and share your experience. For broader insights on how to leverage smart technology effectively, explore this guide.Keeping your appliances running smoothly over the years requires the right tools and a proactive approach. Personally, I rely on a few key pieces of equipment that have made maintenance both easier and more effective. First, a high-quality microfiber cloth is indispensable for cleaning delicate surfaces like refrigerator seals and smart controls, ensuring a thorough clean without scratching. For deep cleaning, I use a soft-bristled brush, which is perfect for dislodging debris from spray arms in dishwashers or lint buildup in washing machine filters. When it comes to diagnosing issues, a multimeter helps verify electrical connections—an essential for troubleshooting smart appliances that rely on sensors and circuitry.
The Hardest Lesson I Learned About Appliances That Still Sticks
One unexpected insight was realizing that even seasoned homeowners often overlook the importance of routine inspections of seals, filters, and connection points. I once believed that replacing filters was enough, but neglecting regular checks led to small leaks turning into costly repairs. The key takeaway? Consistent, proactive maintenance averts surprises and keeps appliances running smoothly.
How I Disproved Common Myths About Appliance Efficiency
For years, I thought setting my refrigerator to the lowest temperature extended its lifespan, but I discovered it actually caused freezer burn and increased energy consumption. This taught me that understanding the correct settings—like keeping your fridge at 37-40°F—can optimize performance and save money. Misconceptions often stem from quick online tips; digging deeper uncovers the truth.
Why Ignoring Small Signs Can Lead to Big Troubles
I learned the hard way that persistent weird noises or slight leaks are early warnings. Addressing issues promptly with tools like a multimeter or by consulting trusted resources can prevent disasters. Before, I’d dismiss minor concerns, but now I see them as signals for preventative action—saving me time and stress.
My Essential Toolkit for Home Appliance Maintenance
I rely on a microfiber cloth for gentle cleaning, a soft-bristled brush to reach tricky spots like spray arms, and a multimeter for troubleshooting electrical issues—these tools have transformed my approach to home care. They’re trusted because they deliver precise results without damaging appliances, making routine maintenance less daunting.
Stay Curious, Keep Improving
The journey of caring for smart appliances is ongoing. Each lesson, no matter how small, guides me toward smarter, more efficient home management. If you’re willing to invest a little time now, you’ll enjoy longer-lasting appliances and a more relaxed home environment. Share your experiences—what’s the most valuable tip you’ve learned so far? For more insights into smart appliance innovation, check out this article on upcoming trends.