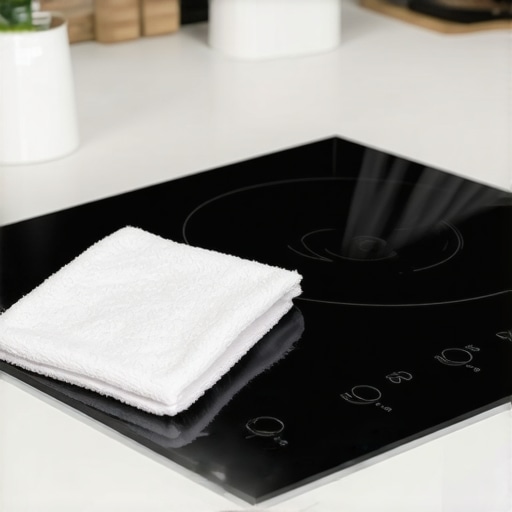
The Easy Way to Clean Sticky Residue Off Induction Cooktops
I remember the first time I tried cooking on my shiny new induction stove. It looked sleek, modern, and promising—until I accidentally spilled some sauce during dinner. The next morning, I faced a stubborn, sticky mess that wouldn’t budge with my usual cleaning routine. Frustration set in as I scrubbed and scraped, only to see the residue stubbornly cling to the surface. That lightbulb moment hit me: I needed to find a smarter, gentler way to handle these messes.
Confronting the Sticky Challenge: Why It’s Hard and How to Tackle It
Sometimes, cleaning your induction cooktop can feel like fighting a losing battle, especially when leftover food or spills harden into a gluey film. It’s easy to resort to harsh chemicals or aggressive scrubbing, but these methods can damage the delicate glass surface or just leave behind streaks and smudges. Over time, I realized that a few simple techniques—not brute force—were the answer to maintaining that pristine, smooth surface.
Have you ever struggled with the residue left after boiling over or a boiling mess? If so, you’re not alone. Many homeowners find themselves stuck with grime that seems impervious to regular cleaning. But what if I told you there’s an easier, more effective way that doesn’t involve scratching or toxic cleaners? I’ve experimented with different approaches, and I can share some trusted tips that will turn your cleaning routine into a quick, satisfying process.
Interesting fact: According to a study published in Kitchen & Bath Business magazine, proper cleaning techniques can extend the life of your induction cooktop and improve its energy efficiency. This means that a good cleaning routine isn’t just about appearance—it’s also about performance and longevity.
In the upcoming sections, you’ll learn easy, tried-and-true methods to remove sticky residue effortlessly, so your cooktop remains a beautiful, functional centerpiece of your kitchen. Ready to make cleaning quick and painless? Let’s dive in.
Heat and Loosen the Gunk
Start by turning your cooktop to a low setting and placing a damp microfiber cloth over the affected area for a few minutes. This gentle heat helps soften dried spills, making them easier to remove. I once tried this after a spaghetti mishap, and within minutes, the hardened sauce was much more manageable. Avoid using abrasive pads at this stage, as they can scratch the glass surface.
Apply a Suitable Cleaner and Let It Sit
Next, spray a specialized glass cooktop cleaner or a mixture of equal parts water and white vinegar onto the residue. Let it sit for 5-10 minutes to break down stubborn grease and food particles. During a previous spill involving caramel, applying the vinegar solution and letting it rest prevented me from scraping raw sugar across the surface. This step ensures that the cleaning agent penetrates deep, reducing the need for aggressive scrubbing.
Gentle Scraping Using Plastic Tools
Use a plastic scraper or a spatula designed for glass surfaces to gently lift the loosened residue. Hold the tool at a 45-degree angle and work slowly to avoid damage. I recall carefully scraping dried-on cheese from my cooktop, and it came off in large chunks without any scratches. Replace the scraper as needed and clean your tool frequently to prevent spreading dirt around.
Wipe Clean and Polish
Finally, wipe the area with a clean, damp microfiber cloth to remove any leftover cleaner and residue. Finish with a dry cloth to avoid water spots. For an extra shine, buff lightly with a soft cloth. Regularly cleaning your cooktop the same way can keep it looking pristine and prevent buildup, similar to how regularly cleaning dishwasher spray arms prevents clogs, as outlined in this guide.
 Many homeowners operate under the misconception that modern appliances are completely maintenance-free or that more features always mean better performance. However, these beliefs can lead to costly mistakes. For instance, some assume that running their refrigerator on the coldest setting extends its lifespan, but in reality, overly low temperatures can cause food spoilage and increase energy bills. Properly calibrated temperatures, as discussed in expert guides, optimize efficiency and longevity. Additionally, there’s a widespread myth that dishwashers don’t require regular cleaning because they self-clean. In truth, neglecting to clean filters and spray arms can drastically reduce cleaning performance and cause unpleasant odors. This oversight is a common trap—think your appliance is fine, but unseen buildup damages its parts over time.
## Are Higher-Tech Appliances Always Worth It?
Sometimes, consumers believe that investing in the latest smart appliances guarantees flawless operation. While advanced features can enhance convenience, they also introduce complexities that might lead to compatibility issues or software glitches. For example, smart refrigerators that track expiration dates are useful, but relying solely on their alerts without manual checks can backfire if connectivity issues occur. Remember, many of these devices depend on stable Wi-Fi connections, and disruptions can render them less effective. Studies indicate that smart appliance integrations sometimes overlook simple yet crucial aspects, like proper ventilation or user maintenance routines. Therefore, equipping yourself with knowledge about these nuances prevents costly repairs and frustration.
## The Oops Factor: Don’t Fall for the Hidden Pitfall
A common mistake is ignoring the importance of proper loading and maintenance—particularly with washers and dishwashers. For example, overloading can hinder cleaning efficiency and strain motors, leading to early failure. Conversely, underloading wastes water and energy. Moreover, neglecting to check for small, overlooked issues, such as clogged spray arms or blocked filters, can cause appliances to underperform over time. Regular inspections and following manufacturer guidelines help prevent these common pitfalls. For instance, I once overlooked cleaning my dishwasher’s microfilter, which caused dirty plates despite a full cycle. Learning from these quick fixes, like cleaning filter traps periodically, preserves appliances and saves money long-term.
## How Can Advanced Usage Improve Your Appliance Lifespan?
For the advanced user seeking maximum efficiency, adjusting settings based on load types and environmental conditions makes a difference. Use low-temperature washes for delicate clothes to prevent fabric damage, or optimize fridge settings seasonally to prevent overcooling. Interestingly, research shows that customizing appliance settings reduces wear and energy consumption—extending lifespan in the process. For example, setting your refrigerator’s humidity controls appropriately helps prevent mold growth and frost buildup, which can impair function. A simple, informed approach—regularly reviewing and adjusting settings—can significantly improve your appliances’ performance and durability.
In conclusion, understanding these nuanced aspects moves you beyond basic operation—saving money, preventing premature failures, and optimizing performance. Have you ever fallen into this trap? Let me know in the comments.
Keeping Your Appliances Running Smoothly
Maintaining home appliances like refrigerators, dishwashers, and washing machines requires more than routine cleaning—it’s about investing in the right tools and adopting effective maintenance habits. Over the years, I’ve discovered that using specialized equipment and software can significantly extend the lifespan of your appliances and keep them operating at peak performance.
My Go-To Equipment for Effective Maintenance
One of the most invaluable tools I rely on is a high-quality ultrasonic cleaner. It’s perfect for cleaning small parts like dishwasher spray arms or refrigerator door gaskets, removing stubborn grime without harsh chemicals. I personally prefer models with adjustable frequency settings, which allow me to target different contaminants effectively.
Additionally, a digital multimeter is essential for diagnosing electrical issues, such as checking the compressor motor in a refrigerator or testing the heating element in a dryer. I always keep a reliable infrared thermometer on hand to monitor temperature consistency across appliances, ensuring optimal operation and early detection of issues.
Embracing Software and Smart Maintenance
Modern appliances increasingly come with diagnostic tools integrated into their smartphone apps. These apps provide real-time status updates, error codes, and maintenance reminders. For example, I use my smart fridge’s app to track temperature fluctuations, which helps prevent spoilage and extends its service life.
I’ve found that subscribing to appliance monitoring services with predictive analytics can also be game-changing. These platforms analyze appliance data to forecast potential failures before they happen, allowing for proactive maintenance rather than reactive repairs. It’s a forward-thinking approach that saves money and reduces downtime.
Implementing Long-Term Care Routines
Routine inspections are vital. I recommend quarterly checks of filters, seals, and hoses. For refrigerators, inspecting door seals ensures proper cooling and prevents energy waste, which is backed by efficiency studies like those from the Department of Energy. Cleaning condenser coils twice a year with a specialized coil brush enhances cooling efficiency and reduces compressor strain.
Don’t overlook the importance of quality replacement parts. I always choose OEM components, as they are designed to fit perfectly and maintain the integrity of the system. Over time, minor upgrades, such as installing a water filter in your fridge, can prevent costly repairs and improve utility of your appliances.
What’s Next in Appliance Care?
As technology progresses, we can expect appliances to become even smarter, incorporating AI-driven diagnostics and predictive maintenance capabilities. This evolution promises to make appliance upkeep more straightforward and reliable, and staying informed about these developments will empower homeowners to maintain their investments effectively.
For now, I highly recommend trying out an ultrasonic cleaner for your dishwasher spray arms or gasket maintenance. It’s a precise, chemical-free way to keep your appliances humming along smoothly. Investing in the right tools today ensures your appliances serve you well for years to come. Remember, consistent care not only saves money but also enhances your home’s efficiency and sustainability.
As I reflect on my journey from reckless spills to mindful maintenance, I realize that truly caring for home appliances is about more than just routine cleaning—it’s about understanding their language and learning the signals they send. The biggest lesson I uncovered is that a little knowledge and intentional care can dramatically extend the life of your appliances, saving you money and frustration in the long run. For example, recognizing when a refrigerator’s compressor is overworking before it fails allowed me to address issues early, avoiding costly repairs. Moreover, embracing tools like ultrasonic cleaners or diagnostic apps transformed my approach from reactive to proactive, enabling me to catch small problems before they escalate. These experiences taught me that a curious and attentive homeowner unlocks the full potential of their appliances, turning maintenance into a rewarding habit rather than a chore.
![5 Best 2026 Dishwashers That Clean Dried-On Pasta [Tested]](https://smartappliancereview.com/wp-content/uploads/2026/03/5-Best-2026-Dishwashers-That-Clean-Dried-On-Pasta-Tested.jpeg)
![4 2026 Dishwashers That Finally Clean Peanut Butter [Tested]](https://smartappliancereview.com/wp-content/uploads/2026/04/4-2026-Dishwashers-That-Finally-Clean-Peanut-Butter-Tested.jpeg)
