

I stood there in my kitchen at 11:00 PM, the house finally quiet, staring at that persistent, glowing red ‘S’ on my control panel. It felt like a personal insult. I had just finished pouring an entire bag of dishwasher salt into the reservoir, making a bit of a mess in the process, yet the machine was insisting it was empty. My hands were still slightly gritty, and my back ached, but the dishwasher wasn’t convinced. If you have ever felt like your appliances are gaslighting you, you are in good company. I almost started browsing for the best quiet dishwashers for homes with open-plan floor designs right then and there just to replace the ‘broken’ one.
The Ghost in the Machine
It is incredibly frustrating when you follow the manual to the letter and the technology refuses to acknowledge your hard work. I remember early in my journey of DIY home maintenance, I actually called out a technician for this exact issue. He walked in, grabbed a wooden spoon from my drawer, stirred the salt reservoir for three seconds, and the light went out. I felt like a total amateur, but that moment taught me a valuable lesson: these sensors are often much simpler—and much more finicky—than we realize. Usually, the light stays on because of air bubbles or a stuck float, not a catastrophic board failure. We are going to walk through exactly how to clear those bubbles and reset that sensor today so you can stop staring at that red light and get back to your life.
Is my dishwasher actually broken or is it just being dramatic?
Most of the time, it is just being dramatic. Before you worry about the common dishwasher error that causes a drain light to flash or other major mechanical failures, you have to understand how the salt sensor works. It isn’t a high-tech laser scanning the volume; it is usually a simple float or an optical sensor that can get confused by the density of the brine or trapped air. According to the United States Geological Survey (USGS), roughly 85% of households in the U.S. deal with hard water, which makes that salt reservoir one of the most hardworking parts of your kitchen. If that salt isn’t dissolving correctly or if there is a ‘salt bridge’ forming, the sensor stays triggered. Have you ever filled yours up only to have the machine act like you did nothing at all? It is one of the most common complaints I hear from neighbors, and the fix is usually much easier than you think.
Why the Light Refuses to Budge
One big mistake I made for years was not adding water to the salt reservoir the very first time I used the machine. If the reservoir is dry, the salt just sits there like a rock, and the sensor never gets the ‘wet’ signal it needs. Even if you have used it for years, sometimes the brine gets so thick that the sensor float gets stuck at the bottom of the chamber. If you are also noticing why your dishwasher is leaving a gritty white film on your plates, it is a sign that the salt isn’t doing its job, regardless of what the light says. We need to make sure the salt is actually circulating. By the end of this, you will know the ‘stir technique’ and a few other tricks to get that sensor back in line. It’s time to stop letting a tiny LED light ruin your evening and start making your appliance work for you again.
Break the Salt Bridge and Reset the Sensor
If you have already filled the reservoir and that red light is still mocking you, you are likely dealing with a ‘salt bridge.’ This happens when the salt at the top of the reservoir hardens into a solid crust, leaving a pocket of fresh water underneath where the sensor actually sits. Because the sensor is submerged in water that hasn’t mixed with the salt yet, it correctly—but annoyingly—reports that there is no salt. I remember one rainy Tuesday when I lost my temper with my own machine after three days of this. I didn’t just add more salt; I grabbed a long wooden spoon and realized the top layer was hard as a rock. I had to physically break through that crust to reach the liquid below. If you are seeing this issue, you might also want to look into the trick to removing hard water spots from your dishwasher interior, as an inactive salt system leads to immediate scaling. To fix the bridge, take a non-metal tool like a plastic chopstick or wooden spoon and gently stir the contents of the reservoir. You are trying to encourage the granules to dissolve and the brine to reach a uniform density.
The Chopstick Method to Release Trapped Air
Sometimes the salt isn’t the problem; it’s physics. When you pour dry salt into the water-filled reservoir, air bubbles can get trapped around the sensor. These bubbles act as a literal shield, preventing the sensor from detecting the brine. I felt absolutely ridiculous the first time I did this, kneeling on the kitchen floor and ‘whisking’ the salt water like I was preparing a soup, but the result was immediate. As I stirred, a massive air bubble burped to the surface, and the ‘S’ light on the panel vanished instantly. This mechanical interference is a common quirk of modern tech, much like how to fix a smart dishwasher that wont recognize its own detergent pods when sensors get obstructed. 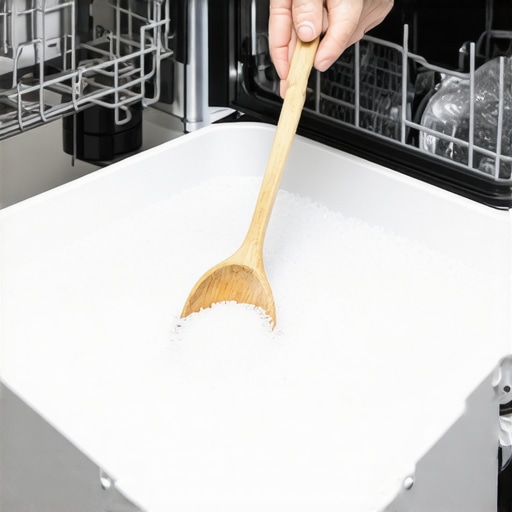
Free the Stuck Magnetic Float
Inside that reservoir, many brands use a tiny magnetic float that rises and falls with the density of the water. If you have gone a long time without using salt, or if you used a lower-quality brand, that float can get gummed up with ‘salt sludge’ and get stuck at the bottom. Even with a full tank of salt, if the float can’t rise, the light stays on. This is similar to how the hidden sensor in your dishwasher that needs a manual scrub can cause drying issues. You may need to reach into the reservoir (ensure the machine is off!) and gently wiggle the float to ensure it moves freely. While you are in a maintenance mindset, it is a great time to how to clean the internal spray arms of your dishwasher for better flow to ensure that newly softened water can actually reach your dishes.
Verify the Seal on Your Reservoir Cap
Finally, check the cap itself. If the rubber O-ring on the salt reservoir cap is dirty or misaligned, salt water can leak out during the cycle, or fresh water can dilute the brine too quickly. This constant dilution keeps the sensor in a state of alarm. Wipe the threads of the cap and the opening of the reservoir with a damp cloth to ensure a perfect, airtight seal. This prevents the ‘phantom’ empty light from returning after just one wash cycle.Beyond just salt sensors, we often carry outdated habits into our interactions with modern tech. For instance, most people still believe that the ‘Heavy’ cycle is the best way to get a deep clean. In reality, the Association of Home Appliance Manufacturers (AHAM) has found that modern sensors are so finely tuned that the ‘Auto’ or ‘Eco’ cycles often provide better results by using specific enzyme-activation pauses that the brute-force Heavy cycle skips.
Stop Believing That Hotter Water Means Cleaner Clothes
One of the biggest myths I see is the obsession with hot water. While it was necessary decades ago, today’s high-efficiency detergents are bio-engineered to work best between 60 and 80 degrees Fahrenheit. If you are constantly cranking up the heat, you might actually be denaturing the very enzymes meant to eat your stains. This is why the secret to using less detergent in your high-efficiency washer is actually the key to a longer-lasting machine. Using too much soap creates a cushion of suds that prevents clothes from rubbing against each other, which is how they actually get clean.
The Vinegar Myth That Destroys Modern Seals
Here is the ‘oops’ factor that breaks my heart every time I see it recommended: using white vinegar as a fabric softener or dishwasher cleaner. I know, everyone says it is a miracle cure. But in my experience, the high acidity of vinegar is a death sentence for the ethylene-propylene (EPDM) rubber used in modern seals and hoses. Over time, that ‘natural’ cleaner will turn your gaskets into mush. Instead of a clean machine, you will be looking for the best front load washers for preventing mold and mildew buildup because your seals have literally started to disintegrate. 
Why is my 2025 model washing machine taking two hours for a ‘normal’ load?
It feels like a downgrade, right? Your old machine did it in 45 minutes, but your washing machines that save water expert advice for 2025 tells a different story. The reason is ‘dwell time.’ To meet strict energy standards, machines now use less water and lower heat, which means they have to tumble the clothes for longer to achieve the same mechanical cleaning action. It is a trade-off: more time for significantly less energy. If you are frustrated by the clock, try looking into how to save money on your electric bill by changing three fridge settings as well—you will find that ‘slow and steady’ is the philosophy across your entire kitchen now. It is all part of the ultimate guide to smart home appliances for a modern living. Have you ever fallen into this trap of thinking faster or hotter was better? Let me know in the comments.Instead of waiting for a breakdown, I have shifted my mindset toward proactive diagnostics. I used to be intimidated by the guts of my machines, but once I realized that most ‘failures’ are actually just sensor drift or debris, I started building a specific maintenance kit. The most important tool I own isn’t a fancy wrench; it is a basic digital multimeter. I use it to check continuity on parts before I ever think about ordering a replacement. For example, knowing how to tell if your dishwasher heating element is actually broken is a five-minute job with a multimeter that can save you from buying a new machine when you really just had a loose wire. It’s the difference between being a victim of technology and being its master.
The one tool that saved me a $300 service call
Beyond electronics, my ‘secret weapon’ is a flexible refrigerator coil brush. Most people never look at the back or bottom of their fridge, but if you have pets, those coils are likely matted with fur. When coils are clogged, the compressor works twice as hard, leading to those annoying sounds you might hear. If you are wondering why your refrigerator is making a clicking noise every ten minutes, it’s often the overload protector tripping because the unit is overheating from dust. I make it a point to how to keep your refrigerator coils clean in a pet-friendly home every six months. According to technical bulletins from Master Appliance Repair technicians, even a 1/10th-inch layer of dust can reduce cooling efficiency by 20 percent and significantly shorten the lifespan of the inverter motor.
How do I maintain my smart appliances over time?
Maintenance in the digital age is as much about software as it is about hardware. I have found that ‘rebooting’ my kitchen once a month—literally power-cycling the smart fridge and oven—clears out cache errors that cause laggy touchscreens. You should also be looking at the best energy efficient fridge settings for your utility bill to ensure your sensors aren’t overcompensating for extreme temperature targets. I also recommend a deep-clean of the ‘unseen’ parts, like the pump filter in your washer. If you haven’t learned how to clean the debris filter on your front load washer effectively, you are essentially asking for a flood or a ‘sudsing’ error. 
Predicting the end of the manual repair era
Looking ahead, I suspect we are moving toward a world where ‘manual’ maintenance becomes obsolete. We are already seeing innovative dishwashers with AI technology you must know that can sense the vibration of a failing motor and order its own replacement part before the machine actually stops working. The future of home appliances trends to watch in 2025 suggest that ‘Edge AI’ will process sensor data locally, meaning your fridge won’t just tell you the door is open; it will tell you the seal is wearing thin based on minute pressure changes. For now, though, we still have to do the legwork. If you want to take your kitchen to the next level, I highly recommend you how to recalibrate your smart oven when the temperature feels wrong using a high-quality independent thermometer. It is the single best way to ensure your expensive ingredients don’t go to waste. My advanced tip for you today: grab a flashlight and check your refrigerator door seal for any daylight or gaps; a failing gasket is the number one cause of high energy bills and spoiled milk.
Hard Truths from My Kitchen Floor
I have spent more time than I would like to admit kneeling in front of an appliance, but those hours taught me a few things the manuals simply do not mention. First, I have learned to never ignore the ‘vibe’ of my machine; a slight change in hum or a new vibration usually signals a filter needs cleaning long before a sensor light ever triggers. Second, I have finally accepted the truth about using white vinegar in your high-efficiency dishwasher—it is just not worth the risk to your rubber seals and hoses, regardless of what the internet says. Finally, I’ve realized that the real difference between inverter compressors and standard fridge motors is how they react to maintenance; a clean machine runs efficiently, while a dusty one burns out twice as fast. You are building a relationship with these tools, and like any relationship, clear communication and a bit of elbow grease go a long way.
My Go-To Maintenance Arsenal
To keep my home running without calling a pro every week, I rely on a few specific resources and tools. I trust a basic digital multimeter above all else because it provides binary answers—part of the circuit is either broken or it is not—which removes the emotional stress of troubleshooting. I also swear by a long, flexible refrigerator coil brush; it is the only way to prevent overheating in a house full of pet hair. For those looking to upgrade their kitchen ecosystem, I frequently consult the list of top smart appliances for a seamless home experience in 2025 to see which brands are prioritizing user-serviceability. These tools are not just about fixing things; they are about reclaiming your time and peace of mind.
Master Your Kitchen Tech Today
You do not need an engineering degree to keep your kitchen in top shape. Whether you are clearing an air bubble from a sensor or performing a how to test if your fridge door seal is actually airtight check, the effort you put in now saves you hundreds of dollars in service fees later. Stop fearing the warning lights and start seeing them as a helpful conversation with your home. When you understand the logic behind your dishwasher salt sensor, the machine stops being a mystery and starts being a reliable partner in your daily life. Have you ever found a weird ‘fix’ for a sensor light that actually worked? Tell me your secret in the comments below!