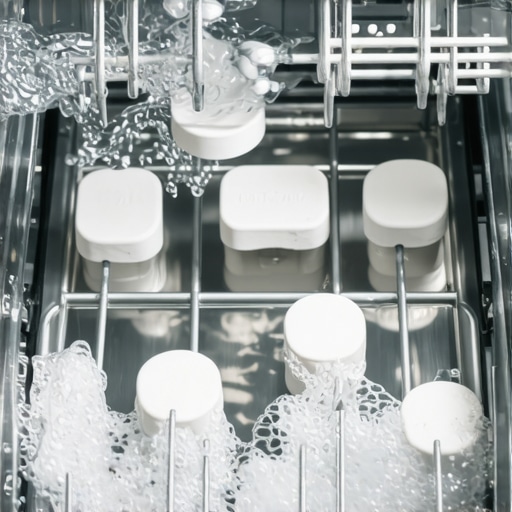
I remember the moment I realized my dishwasher wasn’t doing its job anymore. I’d load up my plates, pour in what I thought was the best tablet, and wait for the magic. But when I opened the door, I found greasy spots, stubborn food residues, and even plastic containers with a cloudy, grimy film. It was so frustrating! That lightbulb moment made me dig deep, and I discovered that many folks face the same baffling issue: their dishwasher tablets aren’t dissolving as they should.
Why Does My Dishwasher Tablet Not Fully Dissolve?
Could the Water Temperature Be Too Low?
One common culprit is water temperature. If your hot water isn’t reaching at least 120°F (49°C), the enzymes and cleaning agents in your tablets can’t activate properly. Over time, I realized I was running my dishwasher on a quick cycle without pre-heating, which meant the tablets never fully melted or dissolved. Adjusting the temperature settings or running a hot wash resolved this for me. Experts say that optimal water temperature is vital for effective cleaning and proper tablet dissolution (source: Smart Appliance Review).
Have you checked your water heater’s temperature lately? If not, it might be worth doing so to ensure your dishwasher’s cleaning potential isn’t being sabotaged right from the start.
Is Your Detergent Too Old or the Wrong Type?
Using old or improper detergent can also be a big mistake. I used to buy the cheapest tablets during a sale, only to find they didn’t dissolve properly. The active ingredients degrade or may be incompatible with your water chemistry. Switching to fresh, high-quality tablets made a noticeable difference. Not all formulations are created equal—some work better in hard water, others in soft water. If you want to get the most out of your dishwasher, it’s a good idea to use the right type of detergent for your local water conditions.
Want a more detailed guide on choosing the best cleaning products? Check out this helpful post.
Is Your Dishwasher’s Spray Arm Blocked or Clogged?
Another sneaky reason is that the spray arms might be clogged or blocked. I once ignored the spray arm holes, assuming they’d never cause issues. But then I noticed my dishes weren’t coming out as clean as before. Cleaning out the spray arms and making sure they spin freely can dramatically improve the dissolution of tablets. Also, check for any buildup that could prevent the water from reaching the tablets effectively.
Are you experiencing similar issues? It might be time to give your dishwasher a little TLC.
Doing the right things can save you from wasting money on ineffective products and from the disappointment of dirty dishes. Together, we’ll explore simple, proven steps to troubleshoot and fix this common problem, so your dishes come out sparkling every time.
Check and Adjust Water Temperature
Start by measuring your water temperature with a digital thermometer during a wash cycle; it should reach at least 120°F (49°C) to activate cleaning agents effectively. If it’s too low, increase your water heater setting or run a dedicated hot water cycle before starting the main wash. I once ran a cycle without checking, and my dishes kept leaving a greasy residue. After raising the temperature, I noticed cleaner dishes and fully dissolved tablets.
Test Water Heater and Make Necessary Adjustments
Find your water heater thermostat, usually located in your basement or utility closet. Use a thermometer to verify the actual temperature, and set it to 125°F (52°C) for optimal cleaning. Be cautious not to set it higher to prevent scalding risks. Adjust the thermostat accordingly, then run a hot cycle to see immediate improvement in tablet dissolution.
Use Fresh and Suitable Detergent
Replace old or improperly stored tablets with new ones stored in a cool, dry place. Consider switching to a high-quality detergent formulated for your water hardness level; hard water can impede dissolution. During a cleaning spree, I once found a box of expired tablets in the back of my cabinet—switching to fresh products made a notable difference. For hard water areas, opt for tablets with built-in water softening agents or use a water softener additive.
Select the Right Detergent for Your Water Type
If you’re unsure about your water’s hardness, test kits are inexpensive and easy to use. Check out guides on choosing detergents based on your water condition at this link for more detailed suggestions.
Clean and Maintain Spray Arms Regularly
Clogged spray arms restrict water flow, preventing tablets from dissolving properly. Remove the spray arms according to your dishwasher’s manual, and check the nozzles for debris. Clean out any buildup with a toothpick or tooth brush. I once ignored this step, and my dishes remained greasy. After a thorough clean, the spray arms spun freely, and tablets dissolved fully, resulting in spotless dishes.
Inspect for and Clear Blockages
Pay special attention to small holes and jets; use a pin to clear any blockages. For a complete cleaning, soak the spray arms in vinegar to dissolve mineral deposits, then rinse thoroughly before reinstalling. Regular maintenance like this can prevent ongoing issues with tablet dissolution and improve overall dishwashing performance.
Ensure Proper Loading and Placement
Loading your dishwasher correctly allows water and cleaning agents to circulate fully around tablets. Place tablets in designated detergent compartments, ensuring they are not blocked by large items. During my last overload, I stacked plates too tightly, and some detergent couldn’t dissolve. After reorganizing for better water flow, I saw immediate improvements in cleanliness and tablet performance.
Optimize Load for Water Access
Distribute items so that spray nozzles have clear paths, avoiding overloading and blocking jets. Keep larger items away from spray arms and ensure nothing obstructs the detergent compartment. Proper loading can be the difference between a failed wash and a sparkling finish.
Run Hot Water Before Starting the Main Cycle
If your dishwasher lacks a pre-wash option, run the hot water faucet at the sink nearest to your dishwasher until hot water flows, then start your cycle immediately. This heats water in the lines, ensuring tablets dissolve promptly. I did this during a cold snap and saw a reduction in residue and film on my dishes.
Preheat for Better Dissolution
In colder months, preheating ensures hot water reaches the detergent, boosting cleaning power. For newer machines, consider using a high-temperature cycle combined with rinse aids designed for better drying and residue prevention.
Many homeowners operate under assumptions about appliances like washing machines, refrigerators, and dishwashers that can sabotage their efficiency and longevity. One widespread misconception is that newer models are always better, but in reality, understanding the nuances of appliance features can save you money and frustration. For example, some believe that high-tech smart appliances automatically optimize themselves, yet manual maintenance and correct usage are often overlooked but essential for peak performance. Overestimating the importance of certain features can lead to neglect of basic maintenance tasks—like cleaning filters or checking water supply lines—that are crucial for appliance health. For instance, many forget that the buildup of mineral deposits in water lines significantly impairs performance; regular descaling can prevent costly repairs and ensure efficient operation, as highlighted by appliance experts (source: Smart Appliance Review).
Keeping Your Appliances in Top Shape
To ensure your washing machine, refrigerator, or dishwasher performs optimally for years, investing in the right tools and adopting proactive maintenance routines is crucial. Personally, I recommend a few specialized gadgets and software solutions that have transformed my appliance upkeep.
Digital Thermal Imagers are game-changers. I use a FLIR infrared camera to detect hotspots in my refrigerator coils and hot spots in electrical components. This allows me to identify inefficiencies or potential failures before they escalate, saving money on repairs and lowering energy bills. Regular scans help me catch issues like uneven cooling or electrical wiring quirks early.
For washing machines, microplastic filters are essential. I attach a microplastic collection filter to my washing machine’s drain hose, which traps debris that might clog the pump or internal filters over time. Cleaning this filter monthly prevents costly pump failures and maintains water flow efficiency. A clogged pump not only strains the motor but can lead to leaks or complete breakdowns, as noted in appliance diagnostic guides (source: Smart Appliance Review).
Smart home monitoring apps are also making maintenance more accessible. I rely on appliance-specific apps that track usage patterns, notify me of irregularities, or suggest filter replacements and descaling schedules. For instance, my refrigerator’s AI alerts me when ice build-up is excessive, prompting me to defrost proactively, extending the appliance’s lifespan.
When it comes to cleaning tools, a dedicated fan-blown air pressure system allows me to clean dust from behind the panels of appliances like the fridge motor or washer control boards effectively. Compressed air cans only go so far, but a small, rechargeable compressor provides continuous, controlled bursts that dislodge dust and debris, helping prevent overheating and electrical issues.
Now, considering the future of appliance maintenance, I predict an increased reliance on AI diagnostics and IoT integration. Appliances will become smarter at self-diagnosis, prompting timely interventions and even ordering replacement parts automatically. Staying ahead involves not just using the right tools but also understanding the evolving tech landscape.
How do I maintain appliances over time?
My best tip is establishing a regular inspection schedule that incorporates these tools—monthly infrared scans, quarterly filter cleanings, and software checks—so small issues don’t turn into expensive repairs. Don’t forget to consult appliance manuals for model-specific maintenance protocols. Remember, the goal is not only to fix problems but to prevent them entirely. Why not try calibrating your smart refrigerator’s temperature sensors or testing your washing machine’s pump with a microplastic filter? These small steps can significantly extend your appliances’ life and performance.
What I Wish I Heard When I Started Fixing Appliances
Early on, I believed newer appliances would always be trouble-free, but the real magic lies in understanding their quirks and maintenance needs. I learned that regular upkeep—like cleaning spray arms and monitoring water temperature—can dramatically extend their lifespan and efficacy. My biggest lightbulb moment was realizing that small, consistent checks prevent big, costly issues down the line. This insight transformed the way I care for all my appliances, from refrigerators to washing machines.
Tools That Make a Difference in Appliance Care
Investing in a digital infrared thermometer has truly changed my maintenance routine. It helps me quickly identify uneven cooling in my fridge or hotspots in electrical parts, ensuring I catch problems early. A microplastic filter for my washing machine’s drain prevented costly pump failures, saving me from surprises and repairs. Additionally, modern smart home apps alert me to irregularities, allowing proactive fixes. These tools aren’t just gadgets; they’re essential for smarter, more reliable appliance ownership.
Your Next Step: Own Your Appliance Magic
Take charge today by implementing regular checks—test your water temperature, clean spray arms, and keep an eye on water clarity. Remember, a well-maintained appliance doesn’t just work better; it lasts longer and saves you money. Don’t shy away from exploring new tools or reading deeper guides—I believe that learning from experience and investing in the right knowledge is the best way to ensure your appliances serve you flawlessly for years to come. Now, I challenge you: Have you tried any of these maintenance tips? Share your wins or questions below, and let’s keep the conversation going!