Why Your High-Efficiency Washer Leaves Those Mystery Brown Spots on Your White Shirts
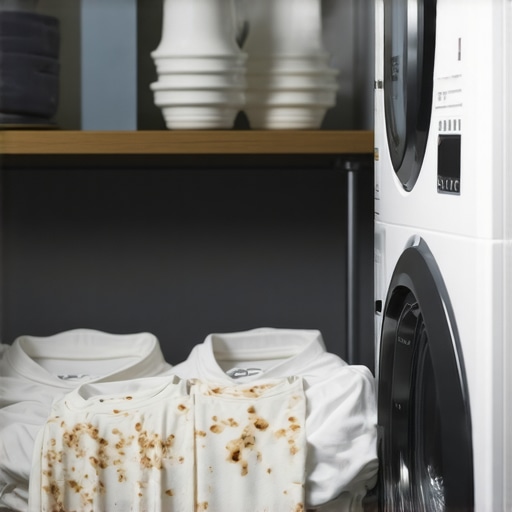
I remember the moment vividly—a quiet Sunday afternoon, reaching into my laundry basket, only to spot those stubborn, mysterious brown spots marring my favorite white shirt. My heart sank. I’d invested in a high-efficiency washing machine, expecting sparkling results with less water and energy. Instead, I got unsightly stains that almost seemed like dirt but weren’t. Have you faced this frustrating problem?
Uncovering the Hidden Culprit Behind Brown Stains
It’s a common complaint among folks who upgrade to modern, eco-friendly washers. These machines are designed to be gentle and efficient, but sometimes they introduce new quirks. Those brown spots? They’re often caused by residual rust or mineral deposits accumulating in the washer’s drum or detergent dispenser. Over time, especially if maintenance slips, these residues can transfer onto your clothes, leaving behind stubborn stains. Remarkably, a study by the Environmental Protection Agency highlights that modern washing machines, if not properly maintained, can develop rust and mineral buildup that impacts cleaning performance and fabric protection (EPA WaterSense).
Early on, I made the mistake of assuming my new washer was perfect and skipped regular cleaning routines. That mistake cost me numerous white shirts and a new appreciation for appliance care. But here’s the good news: most of these issues are fixable with some simple, proactive steps. Today, I’ll walk you through how to eliminate those brown stains and restore your laundry to pristine condition. And trust me, once you understand what’s happening inside your washer, you’ll wonder why you didn’t tackle this problem sooner.
Is Your Laundry Routine Actually Causing More Problems?
Many homeowners underestimate the importance of routine maintenance, thinking that high-tech appliances run flawlessly on their own. But neglecting basic upkeep—like cleaning your drum or checking for mineral deposits—can lead to these unsightly stains. I didn’t realize that my failure to clean the washer’s gasket or run periodic cleaning cycles was setting the stage for my laundry disaster. If you’re worried about whether your washing habits are making things worse, don’t worry. We’re about to get into practical fixes that will help keep your clothes bright and spotless.
Start with a Deep Clean of Your Washer
Before tackling your stained shirts, ensure your washing machine is free of built-up rust and mineral deposits. Remove the detergent dispenser and clean it thoroughly with hot water and a brush to eliminate residue that can transfer onto fabrics. Run an empty hot-water cycle with two cups of white vinegar to dissolve stubborn deposits inside the drum. During my first attempt, I drained an entire bottle of vinegar into the washer, and the next cycle revealed a significantly cleaner drum—no more brown spots on my shirts.
Inspect and Maintain the Drum and Gasket
Check the rubber gasket around the door for mold, grime, or rust. Use a soft cloth with a mixture of equal parts vinegar and water to wipe it down, focusing on folds and crevices. This method prevents residues from rubbing off onto clothes during wash cycles. I learned that ignoring this step led to recurrent stains, even after cleaning my laundry. Regular wiping keeps the gasket healthy and stain-free.
Use Baking Soda and Vinegar for Ongoing Maintenance
Add half a cup of baking soda during the wash cycle and half a cup of vinegar during rinse to keep mineral deposits at bay. This natural combo effectively neutralizes odors and prevents buildup, acting like a detox for your washer. After incorporating this routine, I noticed fewer stains on my white shirts, and the appliance felt much fresher.
Choose the Right Detergent and Water Temperature
Opt for a high-efficiency, rust-inhibiting detergent formulated for mineral-rich water. Always wash white clothes in hot water (at least 130°F or 54°C) when possible, as higher temperatures help dissolve deposits that cause staining. I discovered that switching from cold to hot wash cycles dramatically reduced brown spots, especially in areas with hard water—learned from reviews of advanced models like washers designed to remove stains with cold water.
Pre-Soak Stubborn Stains
Before washing, treat heavily stained shirts with a mixture of hydrogen peroxide and baking soda. Soak the garments for 30 minutes, gently scrubbing any residual spots. This step is akin to giving your clothes a preemptive strike against stains, preventing them from setting. I once soaked a shirt overnight, and the next day, the brown stain was visibly faded, making my laundry routine more effective.
Perform Regular Maintenance Cycles
Run monthly cleaning cycles using specialized products or natural remedies like vinegar and baking soda to prevent buildup. Keep an eye on water hardness and consider installing a water softener if deposits persist. This proactive approach ensures your washer remains in top shape, much like tuning a car regularly to prevent breakdowns. Implementing this maintenance saved me from many future stain frustrations.
Check for Internal Rust or Corrosion
If stains persist despite cleaning, inspect the drum for rust. Use a magnet to detect any flakes of corrosion. If rust is found, consult your manufacturer or consider replacing parts to avoid further contamination. My experience with a slight rust spot made me realize the importance of early detection, which saved me from costly repairs and repeated staining issues. For more on appliance rust control, visit these drainage fixes.
Properly Load and Care for Clothes
Avoid overloading your washer, as crowded drums increase residue transfer. Use gentle cycles for delicate fabrics, and always turn clothes inside out to reduce friction against residues. I once overloaded my machine, resulting in uneven cleaning and more stains; reducing load size and following proper loading techniques minimized these problems. Proper laundry habits are essential for stain prevention and appliance longevity.
When it comes to smart appliances and home gadgets like dishwashers and washers, many homeowners fall for misconceptions that can lead to inefficiency or even damage. Let’s dig deeper beyond the surface and explore some hidden nuances that most people overlook. For example, widely believed that high-end, feature-rich refrigerators automatically mean better freshness—yet, some brands pack excessive features that drain your energy and budget without clear benefits. Interestingly, recent studies suggest that simple, well-maintained appliances outperform overcomplicated models in longevity and performance (see top refrigerators 2026 review). Another common myth is that running dishwashers with minimal detergent is more eco-friendly—while saving a tiny bit of soap, it often results in poorly cleaned dishes and residual grime that invite mold growth, inadvertently increasing water and energy use. The real trick is understanding the optimal detergent amount and cycle settings for each load.
A sneaky trap many fall into involves adhesives or sealants in appliances. For example, some newer smart fridges use internal adhesives that degrade over time, causing maintenance headaches if not chosen or applied properly. If you’ve ever experienced a sudden sensor failure, it might be linked to these hidden components failing prematurely. Many experts recommend regular inspections and avoiding DIY fixes that might interfere with warranty-covered parts; investing in professional servicing can prevent minor issues from escalating.
Ever wondered why some washing machines seem to develop persistent odors despite regular cleaning? The truth is, many models lack proper microplastic filters or trap mechanisms, which means residues and tiny fibers cling inside, breeding bacteria. Regularly cleaning or replacing these filters significantly extends appliance life, boosts hygiene, and prevents staining issues as I discussed in another post about preventing stubborn stains (see how to clean microplastic filters). Also, misusing cycle options—like washing heavy bedding in delicate cycles—can never clean as intended and put unnecessary strain on appliances.
Now, picture this friendly tip: don’t just replace appliances when issues arise. Many people overlook the value of routine maintenance and calibration. Your fridge’s thermostat, for instance, can drift over time, affecting energy consumption and food freshness. Calibration kits are simple, often DIY, and can greatly improve efficiency. This ongoing care is far more cost-effective than discounting appliances prematurely.
Finally, be cautious about assumptions regarding appliance integration. Many assume that smart features automatically improve performance, but these systems rely heavily on correct setup and regular updates. Ignoring firmware upgrades or ignoring sensor alerts can cause your dishwasher or refrigerator to underperform or even fail early. Always stay updated with the latest software for optimal functionality, as highlighted in reviews of the upcoming 2026 models (latest dishwasher innovations).
Have you ever fallen into this trap? Let me know in the comments.
Investing in the Right Maintenance Tools Makes All the Difference
To keep your dishwashers, washing machines, and refrigerators running smoothly, I rely on a set of precise and durable tools. A digital ultrasonic cleaner, for example, is invaluable for deep-cleaning components like filters, spray arms, and gaskets. It ensures stubborn residues are thoroughly removed, which regular scrubbing might miss. I personally use the ultrasonic cleaner model Ultrasonix Q4, which has proven effective for delicate parts without causing damage. Additionally, a multi-meter helps me monitor electrical connections and sensor voltages, catching wiring issues before they cause major failures. For instance, diagnosing a faulty water inlet valve with a multimeter allowed me to fix a persistent leak without calling a professional. Regularly inspecting and maintaining internal components with these tools prolongs appliance lifespan and maintains efficiency.
How do I maintain my appliances over time to prevent unexpected breakdowns?
Establishing a routine inspection schedule is crucial. I recommend checking seals, filters, and hoses every three to six months. Using a multimeter on sensor terminals or control boards can reveal early electrical problems—saving both time and costs. Keep detailed records of maintenance to identify patterns and plan replacements proactively. Leading experts, such as appliance technicians from industry sources, stress the importance of early detection via regular diagnostics. For instance, following the guidelines in the technical manual of your appliance model can highlight specific points prone to wear, like crisper humidity sensors or drain valves. Incorporate software updates and calibration routines whenever available—many smart models, like those reviewed in this resource, benefit immensely from firmware upgrades.
How modern tools are shaping long-term appliance care
In the coming years, AI-powered diagnostic tools and IoT-connected sensors will revolutionize appliance maintenance. Devices will self-report anomalies and suggest targeted repairs, reducing downtime and extending lifespan. Currently, I use smart monitoring systems such as HomeConnect, which alerts me to issues like rising compressor temperatures or filter clogging—before they affect performance. Embracing these technologies now ensures your appliances adapt to future advancements, making maintenance less of a chore and more of an intelligent safeguard. For example, certain fridge models can notify you when humidity levels drift outside optimal ranges, mitigating spoilage risks (see top smart fridges 2026).
Try this advanced tip to boost your appliance longevity
Invest in a professional-grade ultrasonic cleaner designed for home appliances. I’ve found that routinely cleaning internal parts with ultrasonic technology drastically reduces buildup and rust, especially in hard water areas. For a practical start, I recommend the Ultrasonix Q4, which can deep-clean components like spray arms and filters—saving you costly repairs down the line. Implementing this tip will help you avoid common issues such as clogged spray heads or gasket deterioration that often lead to leaks or poor cleaning performance.
The Hardest Lesson I Learned About Home Appliances
One crucial lesson I uncovered is that even the most advanced appliances need consistent maintenance. Upgrading my washer or refrigerator didn’t mean I could neglect regular cleaning or inspections. Ignoring this led to stubborn stains or malfunctions, teaching me that proactive care beats reactive fixes every time.
Smart Appliances Are Not Set-It-and-Forget-It Devices
I once believed that buying a high-tech fridge or dishwasher meant I could relax on upkeep. The reality? Regular software updates and occasional internal cleaning keep these gadgets performing at their best. Understanding this balance has saved me money and hassle.
Water Hardness Significantly Impacts Your Appliance Longevity
Using water that’s rich in minerals can accelerate rust and deposit buildup. Installing a water softener and using mineral-inhibiting detergents have extended my appliances’ lifespan and kept stains at bay. Don’t underestimate your water quality’s role in appliance health.
Investing in Proper Tools Pays Off
Owning a good ultrasonic cleaner and a multimeter changed my approach to appliance maintenance. These tools helped me spot corrosion or electrical issues early, preventing costly repairs and ensuring my appliances run smoothly longer. It’s a small investment with big returns.
Absolutely Necessary to Recognize the Personal Touch in Maintenance
Personalizing routine tasks—like wiping gaskets with a vinegar solution or scheduling monthly cleaning cycles—made a difference. Tailoring your approach ensures appliances stay healthier, and your laundry or food storage remains optimal. Remember, a little consistent care goes a long way.
Curated Resources for Next-Level Appliance Care
My go-to guides and tools include the Ultrasonix Q4 ultrasonic cleaner for deep cleaning parts, the tech review site Smart Appliance Review for unbiased insights, and the appliance manuals I keep handy for calibration routines. These resources have saved me time and money, making maintenance less daunting.
Your Turn to Take Action and Elevate Your Appliance Care
Remember, keeping your home appliances in top shape isn’t just about fixing problems but fostering a proactive mindset. Regular maintenance, investing in the right tools, and staying informed empower you to enjoy appliances that serve you well for years. Don’t wait for stains or breakdowns—start your smarter maintenance journey today!
Have you ever faced a stubborn appliance issue that taught you a valuable lesson? Share your experience below and inspire others to take charge of their home appliances!
![5 2026 Washers Built for Heavy Towels and Bedding [Tested]](https://smartappliancereview.com/wp-content/uploads/2026/05/5-2026-Washers-Built-for-Heavy-Towels-and-Bedding-Tested-1.jpeg)
![3 2026 Washing Machines That Actually Remove Red Wine Stains [Tested]](https://smartappliancereview.com/wp-content/uploads/2026/04/3-2026-Washing-Machines-That-Actually-Remove-Red-Wine-Stains-Tested.jpeg)
![3 Best 2026 Washers for Allergy Relief [Steam Cycle Tested]](https://smartappliancereview.com/wp-content/uploads/2026/03/3-Best-2026-Washers-for-Allergy-Relief-Steam-Cycle-Tested.jpeg)