Have you ever unloaded your dishwasher only to find those pesky plastic containers still damp, with stubborn water spots glaring back at you? I used to think it was just part of the dishwasher game—accept the dampness as a minor inconvenience. But one day, after a quick dinner cleanup, I noticed my favorite plastic storage box still had a thin film of water and a scratchy, dried-on residue. Frustration kicked in. I’d scrub, dry, repeat, all for the plastic to remain stubbornly wet or streaked. That was my lightbulb moment.
Why We Struggle to Get Plastic Containers Truly Dry
Plastic, unlike glass or ceramic, doesn’t dry as easily because of its surface properties. Running the dishwasher’s drying cycle often isn’t enough—water tends to cling to plastics, especially in the nooks and crannies that soap and rinse aids sometimes miss. I didn’t realize early on—thanks to a few common mistakes—that I was simply relying on the dishwasher’s default ‘air dry’ setting. According to industry experts, many people overlook that plastics require special care to dry effectively post-wash, which can save you the hassle of towel drying or dealing with water spots every time.
Is This Trick Actually Worth the Hype?
Honestly, I was skeptical at first. I’d read a dozen tricks online and tried everything from towel drying to opening the door early. But the moment I tried this simple dishwasher hack, everything changed. It’s a straightforward method, and if you’ve ever faced the horror of that water-stained plastic, you’ll want to hear what I discovered. And I’ll admit, I used to make the mistake of ignoring the importance of proper drying procedures—so trust me, I’ve been there. Want to know the secret? Keep reading.
If you’re tired of soaking, wiping, and arguing with your plastic containers after every wash, this post will show you how to turn things around. No fancy gadgets needed—just a minor adjustment to your routine that makes a big difference. Before we dive into the how-to, let’s understand why some plastics stubbornly cling to moisture and what you might be doing wrong without realizing it. Trust me, I wish I knew this tip years ago—my kitchen routine would have been so much simpler. Ready to finally get your plastic containers dry without the hassle? Let’s get started.
To get a complete picture of how modern appliances can make life easier, check out our comprehensive guide on smart home appliances for a modern living. Now, onto the hack that changed my drying woes forever.
.
Use the Heat Boost Setting to Completely Dry Your Plastic
After your main wash cycle, switch your dishwasher’s cycle to the heat boost or extra dry setting. This option increases the drying temperature, helping water evaporate more efficiently from plastic surfaces. I remember a time I forgot to select this setting, and my plastic containers came out damp. The next load, I made sure to activate the heat boost, and the difference was instant—dry and free of water spots.
Leave the Door Slightly Open to Air Dry Plastic
Once the cycle ends, prop the door open just a crack—about half an inch—and let residual heat and air circulation finish the job. Think of it like letting a freshly baked loaf cool uncovered; it allows moisture to escape freely. This method worked perfectly on my busiest week, when I wanted to avoid towel drying but needed containers dry quickly. The open door prevents moisture from being trapped inside, reducing the likelihood of water spots and residues.
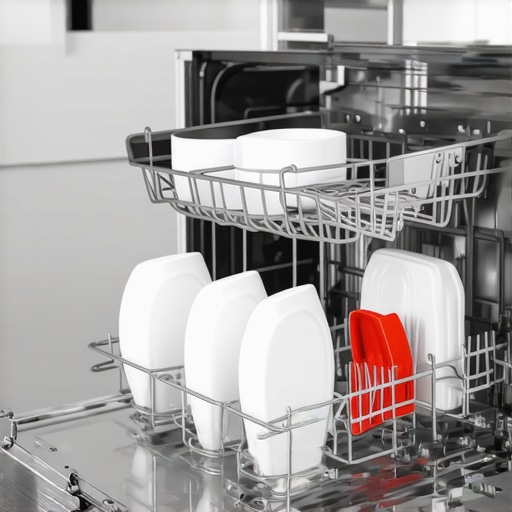
Position Plastic Containers for Optimal Airflow During Drying
Arrange your plastic ware on the top rack with ample space between items. Place larger plastic containers upside down and slightly tilted to maximize exposure to hot air and facilitate evaporation. I learned this trick during a hectic shopping weekend—stacking containers tightly led to incomplete drying, but spacing them out improved results dramatically. Proper placement ensures that hot air reaches all surfaces, speeding up drying time.
Use a Microfiber Towel for Final Touches
If you’re in a hurry or want to avoid water spots completely, grab a clean microfiber cloth and give each container a quick wipe. My experience? After employing the open-door method and rack positioning, a few seconds wiping made my plastic look spotless. It’s a simple step with big impact—no need for harsh chemicals, just a lint-free towel.
Improve Post-Wash Drying with Smart Dishwasher Features
Modern dishwashers come equipped with intelligent drying options. For instance, some appliances use condensation drying that works more efficiently for plastics, or integrated sensors that detect moisture and adjust drying time accordingly. If you’re exploring upgrades, check out our guide on smart appliances for a modern living. When using a smart dishwasher, make sure to activate these features to optimize dryness and save energy.
Establish a Routine to Prevent Water Spots
Consistency is key. After every cycle, immediately implement the open-door method and choose the appropriate drying setting. Over time, this habit reduces water spots and keeps your plastics looking brand new. During a particularly hectic week, I committed to this routine, and the improvement in my kitchen’s appearance was notable—no more streaks or residual moisture, even on the trickiest plastic lids. When combined, these steps transform your plastic drying experience, saving you time and frustration and ensuring your containers are truly dry and ready to use.
Many homeowners operate under certain assumptions about appliances like washing machines, refrigerators, and smart devices, but these beliefs can often lead to inefficiencies or hidden problems. For instance, a widespread myth is that running a dishwasher on the quick cycle saves energy and water, but in reality, this often results in less effective cleaning and more re-washes—ultimately wasting resources. Industry experts highlight that selecting the appropriate cycle based on soil level is crucial for efficiency.
Are Newer Always Better for Your Appliances?
Many assume that the latest models automatically provide superior performance, but this isn’t always true. Some advanced features, like moisture sensors in refrigerators or AI-driven wash cycles, sound promising but may complicate maintenance or lead to overuse of energy if not properly calibrated. Studies from the future appliance trends report reveal that understanding the actual capabilities versus marketing claims is essential for making wise investments.
One common trap is believing that all smart appliances are completely secure and privacy-proof. In fact, many devices continue to collect user data beyond what users realize, potentially exposing sensitive information. Experts advise reading privacy policies carefully and choosing models with transparent data practices—something often overlooked during the excitement of smart home automation.
For example, some consumers are surprised to learn that proper refrigerator temperature calibration isn’t just about setting the dial at a specific number. Incorrect calibration can cause food spoilage or energy waste. You can avoid these pitfalls by following professional tips found in our refrigerator selection guide.
Let’s also not forget the common mistake of neglecting regular maintenance, which can accelerate appliance wear and tear. For example, failure to clean your washing machine’s lint filter or condenser coil can decrease efficiency dramatically. Routine upkeep can extend lifespan and improve performance, a nuance often missed by homeowners unaware of these simple but impactful steps.
So, what about the more sophisticated appliances like AI-enhanced dishwashers? Many users don’t realize that these features require periodic updates to function optimally and that ignoring firmware updates can lead to malfunctions. Check out our latest on AI-powered dishwashers to understand how to maximize their benefits.
Have you ever fallen into this trap? Let me know in the comments. Delving into these nuances can greatly improve your appliance lifespan and save you money in the long run.
Keep It Running Smoothly: Essential Tools and Maintenance Strategies
Ensuring your home appliances operate efficiently over the years requires more than just occasional cleaning—regular maintenance using the right tools can significantly extend their lifespan. Personally, I rely on specialized equipment like digital multimeters for electrical testing and ultrasonic cleaners for descaling stubborn mineral deposits in appliances like dishwashers and refrigerators. These tools help me identify potential issues early, preventing costly repairs later.
One must-have item is a high-quality vacuum for cleaning vents and filters, especially in smart appliances that have intricate airflow systems. Using a handheld vacuum with narrow nozzles allows me to reach into tight spaces, removing dust buildup that can impair performance. Routine filter replacement or cleaning—guided by the manufacturer’s recommendations—is also critical in maintaining optimal operation.
For digital calibration and software updates, I connect appliances directly via their dedicated apps, making firmware updates seamless. This is particularly important with AI-enabled appliances, as frequent updates fix bugs and add features, ensuring they adapt to evolving user needs. Manufacturers like Samsung and LG frequently release firmware patches that improve energy efficiency and functionality; neglecting these can lead to subpar performance and higher energy bills.
Looking ahead, I predict that the integration of IoT diagnostics will become standard, enabling proactive maintenance alerts before failures occur. This trend will make home management even more effortless, reducing downtime and repair costs.
How do I maintain appliances like refrigerators and washers over time?
Regularly scheduled check-ups are vital. For refrigerators, cleaning condenser coils—using a coil brush or vacuum attachment—every six months prevents excessive energy use and overheating. For washers, inspecting hoses for cracks and replacing them every three to five years avoids leaks or burst failures. Using dedicated cleaning tablets or descaling solutions, like those discussed in our guide on dishwasher maintenance, keeps internal components free of grime.
Embracing smart diagnostic tools like network analyzers helps track appliance health remotely. These devices can monitor voltage fluctuations or detect irregularities, alerting you to issues long before they impact functionality. Personal experience and expert advice suggest incorporating these monitoring systems can save substantial repair costs over time.
Finally, establishing a routine—such as monthly cleaning with appropriate brushes and disinfectants—can significantly preserve appliance performance. Don’t overlook the value of manual inspection of seals and gaskets, which can degrade and cause leaks or energy inefficiency if neglected. Try adopting a standardized maintenance checklist, including tool inspections and firmware updates, to keep your appliances in top shape for years to come.

To stay ahead in appliance care, exploring innovative smart home integration options is worth considering. For example, devices with advanced monitoring capabilities, as detailed in our comprehensive guide on smart home appliances, can provide real-time insights and automate maintenance tasks.
Over the years, I learned a few clever tricks that transformed my kitchen routine—especially when it comes to drying plastic containers. It’s tempting to assume that a quick spin in the dishwasher means you’re done, but stubborn water spots and dampness often persist. That’s when I realized that simple adjustments could make a dramatic difference, saving me time and frustration.
The Unexpected Lessons a Dishwasher Taught Me About Plastic Drying
I used to ignore the nuances of drying plastics, thinking the dishwasher’s air dry cycle was enough. But plastics tend to cling to moisture because of their surface properties, especially in those hard-to-reach corners. After multiple rounds of streaks and residue, I discovered that elevating my drying routine with a few strategic steps could be a game changer.
Why Relying on the Default Settings Sometimes Backfires
That lightbulb moment came when I noticed how much water remained after my usual cycle. The key realization? Modern dishwashers have specific features like heat boost or extra dry modes, which I had been neglecting. Leveraging these settings ensures that heat and airflow do their job thoroughly, especially for plastics that love to hold onto moisture.
The Power of Gentle Air Circulation and Patience
Another insight was to leave the dishwasher door slightly ajar once the cycle ends. This simple act allows residual heat and air circulation to finish off the drying process without trapping unwanted moisture. I found that pairing this with proper placement—like positioning larger plastics upside down and giving each piece breathing room—accelerates drying and keeps water spots at bay.
Final Touches That Make a Difference
For those busy mornings or when perfection is a must, I always keep a microfiber towel handy. A quick wipe-down after air drying leaves containers spotless, sparkling, and ready to store or serve. Combining these techniques has made my kitchen more efficient, and I can confidently say that truly dry plasticware is within anyone’s reach with just a little mindful effort.
If you’re eager to improve your plastic drying game, I recommend exploring appliances that come with intelligent drying features. Many modern dishwashers use condensation or sensor-based drying—the smarter, the better—so be sure to activate these when possible. To get a comprehensive overview of how to leverage smart technology in your home, check out our guide on smart home appliances for a modern living.
Little Changes, Big Results for Your Plastic Containers
Adopting these simple habits not only enhances how your plastics dry but also prolongs their lifespan and keeps your kitchen looking pristine. Remember, optimally drying plastics is about understanding surface properties, making the most of your appliance settings, and adopting a proactive approach to airflow and finishing touches. These insights will turn your drying routine from a chore into a quick, satisfying step in your cleaning ritual.
My Favorite Tools for a Spotless Kitchen
Over time, I’ve curated a small toolkit that keeps my appliances performing at their best. A high-quality microfiber cloth is indispensable for quick final wipes, complementing the air drying process. Also, periodic maintenance with appliance-specific cleaning solutions helps keep vents and filters clear, ensuring optimal airflow. For advanced care, I use a digital thermometer to verify that my dishwasher reaches the correct temperature during dry cycles, which I trust for consistent results.
For those interested in future-proofing their home, smart appliances with integrated sensors and adaptive drying features offer excellent promise. Regular updates and proper calibration can optimize performance, saving energy and time. Armed with these insights and tools, you’re well on your way to a kitchen where plastic containers come out perfectly dry every time—making your culinary space both beautiful and efficient.
Take the Next Step to a Smarter Kitchen
Now it’s your turn to upgrade your drying game. Have you ever struggled with stubborn water spots on your plastics? Share your experiences below—let’s learn from each other’s tricks and tips to elevate our kitchen routines together.