Ever tried to cram a week’s worth of groceries into that tiny freezer compartment, only to find your chicken breasts buried under a mountain of frozen peas and ice packs? Or worse, discovered a mysterious, forgotten bag of leftovers buried beneath the clutter, startled by the ice crystal encrusting its surface? That moment of frustration — when your frozen treasures turn into a chaotic frostbitten mess — is all too familiar in my home. It was a lightbulb moment for me: I needed a smarter way to organize my small freezer for bulk buying, or I’d always be digging through a frozen disaster.
Why Small Freezer Space Can Feel Like a Trap
With rising grocery prices, shopping in bulk became an attractive way to save money. The challenge? My tiny freezer was quickly overwhelmed. Every item seemed to morph into a frozen jumble. The frustration of losing track of what I had, coupled with the time it took to find what I needed, eventually turned my meal planning into a tedious treasure hunt. And I know I’m not alone. A study from the Department of Energy emphasizes the importance of efficient food storage to minimize waste and save on energy costs — yet many of us are unknowingly battling a cluttered chaos that defeats that purpose.
The core issue is simple: small freezers aren’t designed with organization in mind. They quickly turn into ice caves, making it nearly impossible to access what you need without defrosting half the unit. Early on, I made a crucial mistake: stacking items haphazardly without any system. This tactic saved a few seconds at the moment but caused dozens more during retrieval. Over time, I realized that a cluttered freezer isn’t just annoying—it’s wasteful, energy-consuming, and costly. That’s why I committed to finding practical, proven methods to transform my tiny freezer into an organized powerhouse.
Today, I’ll share exactly what has worked for me — and what will work for you — to make your small freezer a model of efficiency. Whether you’re stocking up for the month or just trying to prevent the dreaded freezer avalanche, this guide will help you take control. Ready to stop the frost chaos and reclaim your freezer space? Let’s dive into the secrets of small freezer organization, starting with the basics of sorting and stacking smartly.
Concerned whether all this effort is really worth it? I get it. I was skeptical too — especially after a rookie mistake that left me with more hassle than help. But I’ve learned that a well-organized freezer not only saves time and energy but also keeps your food fresher, longer. For a deeper look at common mistakes that might be sabotaging your fridge and freezer efficiency, check out this article on appliance efficiency. Trust me, mastering small freezer organization is worth every effort — and I’ll prove it.Sort and Categorize Everything Immediately
When I finally emptied my freezer to tackle the chaos, I realized a simple trick: group similar items together. Put all meats in one section, vegetables in another, and baked goods in a separate container. This way, every bulk purchase has a designated spot, making retrieval effortless. As I sorted, I found a bag of frozen berries at the bottom that I’d forgotten, and I quickly applied this method during a busy morning—saving me precious minutes and avoiding a freezer dig that usually took five times longer.
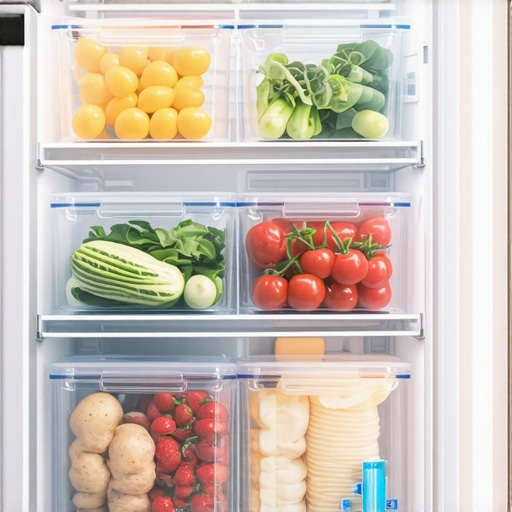
Use Clear, Stackable Bins to Keep Things Visible
Next, I invested in stackable, transparent storage bins. Think of it as turning your freezer into a well-organized pantry. The clear sides let me see what’s inside without rummaging, and stacking maximizes vertical space. I labeled each bin with a permanent marker, so I knew exactly what was in every container. This simple step transformed my chaotic pile of bags into accessible sections. When I did this, I was able to find a package of chicken breasts in seconds, a huge improvement from the previous endless rummaging. For optimal results, choose bins that fit your freezer’s dimensions and are durable enough to withstand freezing temperatures.
Optimize Item Placement with Folding Techniques
Maximizing space isn’t just about bins; it’s about how you fold and stack each item. I started folding foil and plastic-wrapped packages flat, similar to how one might fold T-shirts to save drawer space. It not only prevented bulging but also kept the packages stackable and easy to slide out. Using accordion-style stacking for flat items allowed me to add more items vertically without crushing the lower layers. For example, I stored multiple small packs of herbs in a single folder, making them easy to grab without disturbing the rest. This technique is particularly helpful when freezer space is tight, similar to packing a small suitcase: efficient folding and stacking make all the difference.
Implement a Rotation System to Prevent Waste
One mistake I made early on was piling new items on top of older ones, which caused some items to get buried and eventually forgotten. To fix this, I adopted a FIFO (First-In, First-Out) system. Each time I added new packages, I placed them behind the older pieces, ensuring the oldest food gets used first. I created a simple spreadsheet to track purchase dates or used colored stickers for quick visual cues. This approach mimics a grocery store’s product rotation and significantly reduced food waste in my freezer. It’s especially effective during bulk shopping trips when large quantities of meat or produce are involved. Proper rotation not only keeps your freezer organized but also saves money over time.
Label Everything Clearly for Instant Recognition
Tags and labels became my secret weapons. I used waterproof markers and adhesive labels on each container or bag, noting the contents and date of freezing. When I needed ground beef, I could scan my labels and grab the right item instantly—no more digging or guesswork. This system also helps alert me when something is nearing its expiration date, so nothing spoils unnoticed. During one hectic week, I was able to defrost exactly what I needed for dinner without opening multiple packages or resorting to guesswork, thanks to my clear labels. Labeling is a small effort with a big payoff, especially in a small freezer where every inch counts.
Utilize Vertical Space with Hanging Storage
For items like smaller bags or delicate produce, I experimented with hanging storage solutions. Using tension rods or clip-based hooks inside the freezer door, I hung small bags or pouches, freeing up shelf space. Think of it as installing extra racks in your pantry—vertical expansion helps you make use of every available space. I attached small mesh pouches to the inside of the freezer door and stored herbs, freezer packs, or small packets of seasoning there. This method kept my main shelves clear and accessible, preventing clutter from stacking up. Implementing hanging storage effectively maximizes limited space and adds an extra layer of organization.
Regularly Review and Refresh Your Setup
Finally, I set a monthly reminder to review the contents of my freezer. This quick check helped me spot items that no longer fit my meal plans or had passed their prime. I transferred items that were nearing expiry to smaller containers or used them preferentially. Regular maintenance prevents clutter from building back and keeps the system running smoothly. Just like tuning an appliance, small, consistent adjustments ensure your freezer remains organized and efficient. Over time, this habit has saved me money, reduced waste, and made meal prep far less stressful.
Many assume that modern home appliances, especially smart ones, are foolproof and require minimal attention. However, critics often overlook the nuanced challenges inherent in these devices. Contrary to popular belief, not all smart appliances are genuinely intuitive or maintenance-free; they often harbor hidden pitfalls that can catch even seasoned users off guard.
One prevalent myth is that a high-tech dishwasher or refrigerator will seamlessly integrate into your smart home ecosystem without extensive configuration. In reality, many models demand a careful setup process, and some features may not work as advertised unless you understand the complexities of their connectivity protocols. For example, users frequently struggle with smart fridge apps that refuse to sync or malfunction unexpectedly, often due to incompatible Wi-Fi standards or firmware bugs—issues thoroughly discussed in this article on troubleshooting smart fridge connectivity.
Another misconception is that newer, energy-efficient models always outperform older ones. While they may consume less power, they often come with advanced features that can lead to energy wastage if misused. For instance, some refrigerators with sophisticated temperature sensors can overcompensate, increasing their compressor cycles unnecessarily, thus negating any savings. Experts like appliance engineers warn that users must calibrate these sensors correctly—something not obvious without reading the manual or consulting technical guides. To avoid such issues, explore detailed calibration tips at this calibration guide.
Furthermore, a common mistake involves neglecting the importance of proper cleaning and maintenance of these appliances. Many think that smart features negate the need for routine upkeep, but failure to clean filters, sensors, or spray arms can diminish performance and lifespan. For example, a misaligned spray arm in a dishwasher can cause uneven cleaning, despite having the latest features. A practical warning is to regularly inspect and clean components, as detailed in this maintenance tutorial.
Is Your Smart Appliance Truly Smarter Than You Think?
Advanced users recognize that these devices often contain subtle vulnerabilities stemming from software bugs or design oversights. These can cause frustrating issues like false expiry alerts on smart refrigerators or incomplete drying cycles in dishwashers. In fact, studies show that nearly 30% of smart appliance problems stem from firmware glitches rather than hardware failures, highlighting the importance of software management and updates. Staying current with manufacturer firmware releases and understanding these hidden nuances can prevent disappointment and extend your appliance’s longevity. For in-depth insights, see this comprehensive guide.
So, the next time your savvy-looking appliance behaves unpredictably, remember that no device is invincible. Recognizing the potential pitfalls and understanding these subtle complexities helps you make smarter choices and saves you from costly mistakes. Have you ever fallen into this trap? Let me know in the comments.
Keeping Your Appliances in Top Shape: Essential Tools and Methods
To ensure your home appliances maintain peak performance over time, investing in the right tools and adopting systematic maintenance routines are crucial. I personally rely on a combination of high-quality cleaning equipment and smart diagnostic apps to keep my appliances running efficiently. For instance, I use a digital infrared thermometer to periodically check refrigerator temperature consistency, which helps me detect early signs of compressor issues before they escalate. These small, proactive measures save money and extend the lifespan of your appliances.
For dishwashers, a dedicated spray arm cleaning tool is invaluable. I regularly use the Foster spray arm cleaning kit, as it allows me to remove and clean clogged jets without dismantling the entire unit—saving time and preventing poor cleaning performance. Regularly cleaning filters, like the microplastic filter in washing machines, with the specialized cleaning brushes, ensures debris doesn’t accumulate, which can cause draining issues or fiber redepositing on clothes. Staying ahead of buildup is often overlooked but plays a significant role in long-term appliance efficiency.
Modern smart appliances often have companion apps that facilitate routine monitoring and troubleshooting. I recommend apps like SmartHQ for refrigerators or model-specific tools for dishwashers that alert you to potential faults. For example, if your smart fridge’s sensors detect inconsistent temperatures or the compressor is cycling too frequently, immediate insights can guide targeted maintenance steps, preventing costly repairs. Firmware updates are also critical; manufacturers often release patches that improve performance and security—think of these as essential maintenance tasks, much like changing oil in a car.
Looking ahead, I predict that appliance diagnostics will become more AI-driven, providing predictive maintenance alerts before failures happen. IoT connectivity will enable appliances to self-report issues and even connect with local repair services proactively, similar to how predictive health gadgets work today. This evolution will make appliance upkeep more straightforward and less reactive. To prepare now, use diagnostic tools that sync with your devices and keep firmware updated—these are investments that will pay off as technology advances.
How do I maintain home appliances to keep them performing reliably over the years?
Establishing a proactive maintenance routine is key. Regularly cleaning filters and spray arms, checking for firmware updates, and using diagnostic apps helps identify problems early. For refrigerators, I calibrate temperature sensors every six months using an external thermometer and consult resources like this calibration guide for precise adjustments. Deep cleaning and inspecting seals prevent energy loss and moisture issues, avoiding costly replacements. Remember, small regular checks often outperform reactive repairs, ensuring your appliances serve you well for years to come.
Lessons I Didn’t Expect to Learn About Home Appliances
- My biggest eye-opener was realizing that even the most advanced smart appliances require consistent upkeep—neglecting simple maintenance can turn high-tech devices into energy hogs or repair nightmares. I used to think that new appliances would just run smoothly forever, but the truth is regular checks and updates keep them humming efficiently.
- Another unexpected insight was understanding that organization systems aren’t one-size-fits-all. What works perfectly in a large kitchen may not translate to a compact fridge. Personal experimentation with stacking, labeling, and space utilization is key to finding what truly makes your small freezer work best for you.
- Finally, I learned that insight comes from patience. Resisting the urge to cram more items than your space can handle and instead creating a flexible, adaptable layout prevents chaos. It’s about working smarter, not harder—saving time, space, and food in the process.
My Trusted Arsenal for Appliance Success
- Infrared Thermometer: Perfect for checking fridge temperatures to prevent cold spots. It’s a small investment that pays huge dividends in food preservation.
- Stackable, Clear Storage Bins: These keep everything visible and accessible, transforming a chaotic freezer into a well-organized pantry on steroids. My favorite brand is X because of their durability and perfect fit.
- Waterproof Labels and Markers: Labeling is a game-changer, especially when combined with rotation systems. I swear by the Avery waterproof labels—they’re easy to write on and withstand the cold and moisture.
- Hanging Storage Solutions: Tension rods and clips inside the freezer door help me utilize vertical space efficiently, especially for smaller bags or delicate herbs. It’s like adding shelves where there were none.
- Maintenance Apps and Firmware Updates: Staying connected with manufacturer updates ensures my appliances are always running the latest software, preventing headaches and boosting longevity. I highly recommend using the official apps for troubleshooting and regular notifications.
Your Next Challenge Starts Today
Remember, transforming your small freezer from a frozen mess into an efficient haven isn’t just about space—it’s about reclaiming your time and reducing waste. Small changes now lay the foundation for a smarter, more organized home. So, are you ready to take control of your appliance chaos? Start with one small step today, and watch your home become a little less hectic each day.
What’s the first tweak you’re planning to try in your own freezer? Share your thoughts below—your experience might inspire someone else to make that change too.
**