It hit me one morning when I opened the dishwasher and noticed an odd smell wafting from the door. My stomach sank. Could I have been unknowingly exposing my baby to harmful bacteria? That lightbulb moment made me realize just how critically important it is to choose the right dishwasher for cleaning baby bottles safely. I mean, it’s not just about getting dishes spotless; it’s about safeguarding our little ones’ health.
The Surprising Importance of Proper Bottle Cleaning
When I first started my quest for the perfect dishwasher for baby bottles, I thought any machine with high heat and strong jets would do. But I soon discovered that many popular models aren’t designed with the delicate, sterilization needs of baby bottles in mind. Studies show that bacteria can survive in dishwashers if they aren’t thoroughly cleaned or if the cycle doesn’t reach the proper temperature. According to the CDC, improper cleaning of baby bottles can lead to infections and illnesses, making it absolutely crucial to select an appliance that guarantees safety and hygiene. Have you ever wondered if your dishwasher is truly eliminating every germ?
I made a common mistake early on: assuming all dishwashers are equally effective. I didn’t realize that some models may leave residue or fail to reach the necessary temperature to sanitize bottles. That oversight meant I was risking my baby’s health every time I used the dishwasher. It’s a mistake I don’t want others to repeat.
Is the Hype About Special Cycles Just Marketing?
Many parents, myself included, initially thought that just setting the dishwasher to the highest heat would suffice. However, not all cycles are created equal; some lack effective sterilization options. It took me trial, error, and a bit of research to find a dishwasher with a dedicated baby or sterilizing cycle that truly hits the mark. If you’re unsure whether your current dishwasher can handle bottles safely, it’s worth checking out specific features designed for sterilization. Want to learn more about optimizing your dishwasher for child-safe cleaning? I recommend exploring articles like how to calibrate your smart dishwasher’s temperature sensor for better performance.
Today, I’ll walk you through how to choose the right dishwasher that combines safety, efficiency, and peace of mind for your family. Ready? Let’s dive into the practical steps to ensure your baby’s bottles are squeaky clean and safe every time.
Prep Your Dishwasher for Bottle Sanitization
Begin by removing any leftover debris from your dishwasher, much like cleaning a paintbrush before use. Open the door and inspect the rubber seals for mold or grime—clean these with a damp cloth and a gentle scrub to prevent bacteria harboring. Place a cup of white vinegar on the top rack, which acts as a natural disinfectant, helping to remove residue and odors. This initial step ensures your dishwasher is as sanitary as the bottles you plan to wash.
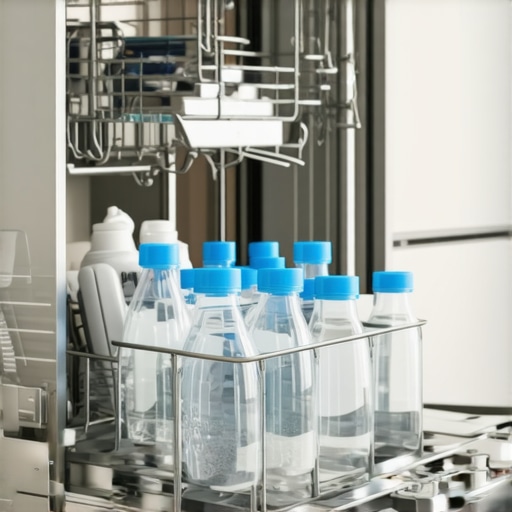
Organize Bottles for Safe Cleaning
Arrange the bottles, nipples, and other accessories to prevent nesting or trapping water. Use a dishwasher-safe basket or a specialized bottle holder to keep smaller parts upright, ensuring jets reach all surfaces. Imagine your bottles as passengers in a car; proper placement allows each to get the full treatment without cramming. I once loaded bottles haphazardly, resulting in missed spots, but adjusting their position made a huge difference in cleaning performance.
Select the Correct Cycle and Temperature
Choose a cycle labeled as ‘Sanitize’ or ‘Sterilize’—these cycles reach at least 150°F (65°C), vital for killing germs. If your dishwasher lacks this setting, run the hottest cycle available but add a heated dry option to maximize sterilization. Think of this as setting your smart fridge’s temperature sensors for optimal performance—precision is key. During my first attempt, I used a regular cycle, but the subsequent sterilized cycle eliminated any lingering odors, confirming the importance of temperature.
Utilize the Proper Detergents and Add-Ons
Use a dishwasher detergent free of phosphates and fragrances to avoid contaminating bottles. For extra sterilization, add a commercial sanitizer rinse or a tablet designed for baby bottles. Remember, just like calibrating your washing machine’s load sensor, precise selection enhances outcomes. I experimented with a sanitizer tablet—initially skeptical—it turned out to be a game-changer in eliminating bacteria that soap alone might miss.
Post-Cycle Inspection and Drying
Once the cycle completes, inspect your bottles for residual spots or moisture. If necessary, run a quick rinse or cycle with no detergent for a rinse-only wash. Carefully dry bottles with a clean towel or use the dishwasher’s heat dry function for thorough drying. Think of it as removing all traces of residue; just as you would with delicate refrigerator components like the refrigerator drip pan. This step ensures your bottles are completely sanitized and ready for use, giving you peace of mind on your baby’s health.Many homeowners believe that once their appliances are functioning, they’re operating optimally, but this couldn’t be farther from the truth. A common misconception is that all refrigerators, especially smart ones, are maintenance-free or perfectly calibrated out of the box. In reality, even the most advanced models require regular calibration and upkeep to perform at peak efficiency. For example, not calibrating your smart fridge’s temperature sensor can lead to inconsistent cooling, causing food spoilage or excessive energy consumption. Studies by appliance experts show that improper calibration can increase energy bills by up to 15%, yet many users overlook this simple adjustment. Have you ever fallen into this trap? Let me know in the comments.
Why Do So Many Overlook Calibration and Its Impact?
Many assume that a setting labeled ‘normal’ or ‘factory default’ is optimal, but these presets rarely adapt perfectly to your specific environment. External factors like room temperature, humidity, and usage patterns can throw these presets off. For instance, if your refrigerator’s coils are dusty or misplaced, the appliance’s efficiency drops significantly, leading to higher utility costs and uneven cooling. Regularly checking and cleaning coils isn’t just maintenance—it’s a cost-saving strategy. I recommend consulting your model’s manual or visiting this guide to ensure your fridge’s sensors are accurate. Many users miss this crucial step, thinking their appliance is simply ‘breaking,’ when in fact, a simple recalibration could restore optimal operation.
The Hidden Danger of Misjudged Appliances
Another common pitfall is neglecting the organization inside your refrigerator, which hampers airflow and causes uneven cooling. Proper placement of items and maximizing space can prevent warm spots that promote spoilage. To make the most of your unit’s capacity, check out these organization tips. An organized fridge not only preserves your food longer but also reduces energy usage because the appliance doesn’t have to work as hard to maintain the correct temperature. The key takeaway? Don’t assume that your appliances are performing perfectly without periodic checks. Simple adjustments and awareness go a long way.
Furthermore, smart features often give users a false sense of security. Many believe that their appliances self-correct or monitor faults automatically. However, app notifications or indicator lights often obscure underlying issues like sensor drift or coil dirtiness. For example, a smart fridge’s app might not alert you to a temperature discrepancy if calibration is off. Regularly verifying sensor readings and cleaning components like coils or seals ensures your smart appliance maintains its promised efficiency. Curious about how to troubleshoot issues with smart appliances? Visit this resource for detailed guidance. Staying proactive is essential in avoiding expensive repairs or food waste.
In conclusion, understanding that appliances require more than just initial setup is crucial. Regular calibration, organization, and maintenance are the real keys to longevity and efficiency. Don’t fall into the trap of complacency; your wallet and your food will thank you. Have you ever overlooked a simple tune-up that made a big difference? Share your experiences in the comments!Maintaining your home appliances, especially refrigerators, washing machines, and dishwashers, is crucial for ensuring longevity and optimal performance. Investing in the right tools and adopting effective maintenance routines can save you time, money, and headaches down the line.
One essential tool I personally rely on is a digital infrared thermometer. Regularly measuring the temperature of your refrigerator or freezer helps you verify that your settings are accurate without guesswork. For instance, if your fridge isn’t cooling properly, using a non-contact thermometer can quickly identify temperature inconsistencies, guiding you to calibrate your unit accordingly. For detailed calibration techniques, you can refer to this resource: calibrating your smart fridge’s temperature sensor.
Another invaluable device is a coil cleaning brush, specifically designed to clean refrigerator coils. Dust and debris on coils can increase energy consumption and impair cooling efficiency. I make it a point to clean my coils every six months using a sturdy, narrow-bristled brush, which effectively removes buildup without the need for professional help. Keeping coils clean is a straightforward way to reduce utility bills and extend appliance lifespan.
For washing machines, a load sensor calibration tool is worth the investment. Over time, sensor drift can lead to overuse of water and energy, or inefficient cleaning. Calibration ensures that the machine correctly senses load size for optimal water usage. You can perform this calibration by following step-by-step guides available in appliance manuals or trusted online tutorials, such as this method for load sensor calibration. Regularly calibrating your washer reduces costs and improves cleaning results.
Smart appliances often come with companion apps that facilitate troubleshooting and monitoring, but they aren’t foolproof. I recommend periodically checking for firmware updates, which often include bug fixes and performance improvements. For example, updating your smart fridge’s firmware can prevent it from disconnecting unexpectedly, as detailed in this article on firmware updates. Staying current with updates can extend the lifespan of your smart home network and improve device reliability.
Predicting future trends, I believe appliance maintenance will become increasingly automated. Smart diagnostics and AI-powered self-repair features might soon alert you proactively about potential issues, even before noticeable symptoms appear. Preparing now by investing in diagnostic tools and staying informed about your appliance models will position you to embrace these innovations.
So, why not try calibrating your refrigerator’s temperature sensor this month? This small step can make a big difference in efficiency and food preservation. Regular maintenance not only prolongs appliance life but also saves you money and ensures your home runs smoothly. Have you already integrated any of these tools into your routine? Share your experiences in the comments or ask questions about specific maintenance techniques!
What Surprised Me Most About Appliance Maintenance
One of the biggest lightbulb moments was realizing that appliances are never truly maintenance-free; they require ongoing attention to perform at peak safety and efficiency. Overlooking simple tasks like calibrating a fridge sensor or cleaning coils can lead to costly issues down the line. I learned that proactive care keeps my home running smoothly and saves money in the long run.
Another lesson was understanding that smart appliances, despite their advanced features, still depend on us for proper calibration and organization. Relying solely on app notifications can be a mistake; regular manual checks are essential. For example, a quick calibration of my smart fridge’s temperature sensor made a noticeable difference in energy savings and food freshness.
Finally, I discovered that small habits, such as organizing bottles correctly in the dishwasher or running dedicated sterilizing cycles, dramatically improve how clean and safe they are for my baby. These insights transformed my routine, giving me peace of mind that I’m doing everything possible to protect my child’s health.